Arts or Education Archives - Page 7 of 17 - Cheekwood | Page 7
x icon Close
test

Tots! Activity: Fall Leaf Paintings
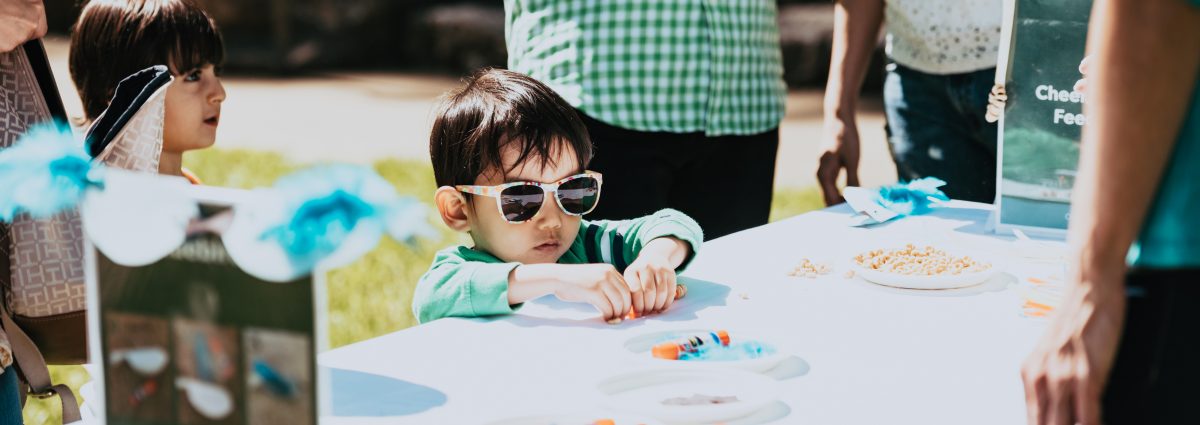
Tots! Activity: Fall Leaf Paintings

As Cheekwood’s Tots program is temporarily suspended, we are sharing today’s activity for parents and tots to activate at home. Use our files to create your own fall leaf paintings, then share your work with us by tagging @cheekwood on Instagram and using #cheekwoodtots!

Here’s what you’ll need:• Leaf template *See template below
• Large Zip top plastic bag

• White cardstock

• Paint in red, orange, yellow, brown, green

• Scissors

• Pencil


Maple Leaf Template  Oak Leaf Template  


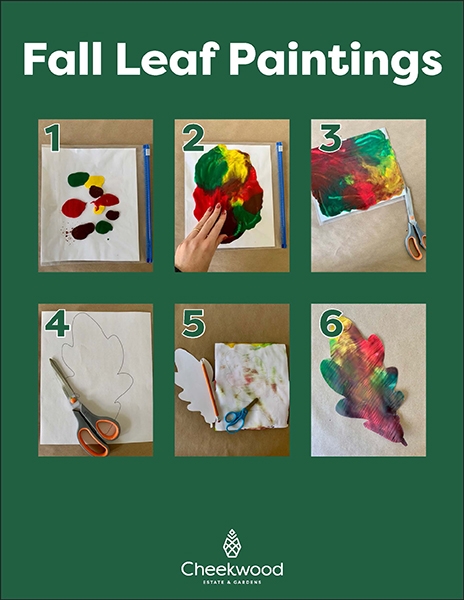
Directions:1. Place the white cardstock paper in the large zip top bag.

2. Squeeze paint onto the white paper in the bag and seal it tight.

3. Squish the paint around with your fingers to cover the whole piece of paper.

4. Remove the painted paper from the bag and set aside to dry. You can cut the bag open if needed to help remove the paper.

5. While the painting dries, print out the leaf template and cut it out.

6. Once the paper is dry, trace the leaf on the back of the painting and cut the leaf out.

7. Optional: Create several leaves, hole punch them and hang on string to create a fall leaf garland.


Try pairing the activity with one of these books:
Fletcher and the Falling leaves by Julia Rawlinson

Goodbye Summer, Hello Autumn by Kenard Pak

Leaves by David Ezra Stein


Ask your explorer: • What happens to leaves in the fall? What colors do they turn?

• How do trees look different now than they did in the summer?

• What did we do to the paint to make a colorful leaf?
Fall-Leaf-Painting
test

From 2010 to 2020: Reflecting on Chihuly at Cheekwood with Dale Chihuly

From 2010 to 2020: Reflecting on Chihuly at Cheekwood with Dale Chihuly

Dale Chihuly is one of the most innovative contemporary American artists, and is among the best-known artists working with glass today. Working to unite color, light, form, and space to deliver uniquely immersive experiences, Chihuly has completed ambitious architectural artwork installations all over the world, making him a household name.

In May of 2010, Nashville was not seemingly ready for the impact of Dale Chihuly. At the beginning of the month, the city experienced the largest flood in its history when the Cumberland River crested more than 11 feet above flood level, leaving 10,000 people in the region displaced. Local businesses were shut down and just in a couple weeks, the city’s largest exhibition, spanning two museums, was set to open.

Cheekwood_2020_67A6990R3_sml_gk_High-res-JPEG-_not-resized_-1

On May 25, 2010, Chihuly at Cheekwood and Chihuly at The Frist opened to the public, welcoming record-number visitors for both institutions. Despite the city’s tragedy, Dale Chihuly’s sculptures united Nashvillians, inspiring them to get out and enjoy what the city still had to offer.

Now in 2020, the city has almost doubled its population in the past 10 years, experiencing incredible growth and prosperity. The Nashville of 2020 feels like an entirely new city and yet, institutions like Cheekwood continue welcoming new visitors, adding to the cultural depth of the city.

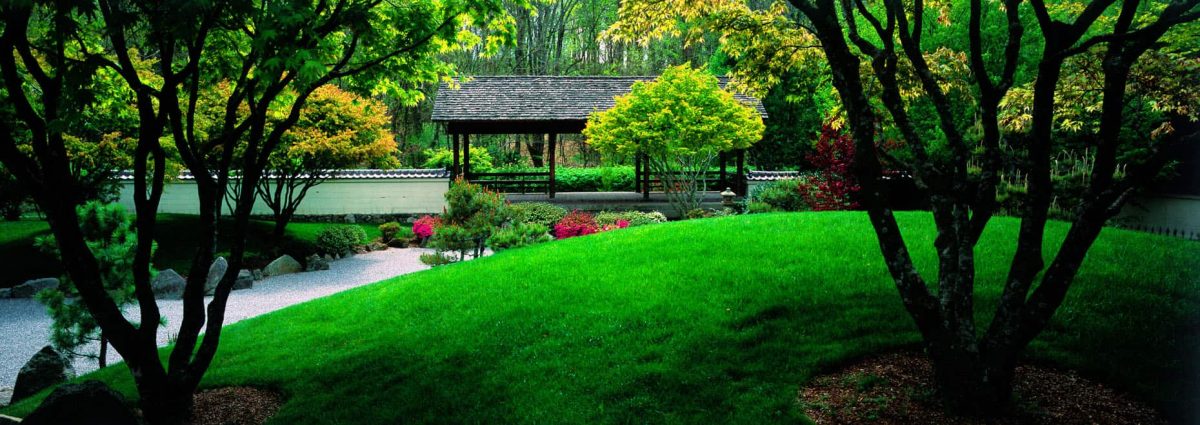
Celebrating 60 years of public service, Cheekwood is firmly cemented as a centerpiece for the community, a place for intellectual stimulation, beauty and respite, and serving as a place of solace during these unprecedented times. This year marks the opening of the Bracken Foundation Children’s Garden, as well as the restoration of the Ann & Monroe Carell Jr. Family Sculpture Trail and the Blevins Japanese Garden.

Chihuly’s works, responding to the gardens’ natural beauty, are installed throughout the estate, enticing visitors to explore this new iteration of Cheekwood. With 12 outdoor installations, two indoor chandeliers and over 3000-square-feet of museum exhibition, Chihuly is enchanting Cheekwood.

The magic of Chihuly’s glass installations lies in part in their effortless integration into nature. The reflectivity of the glass, the whimsical forms, and the bold colors of his sculptures often complement those found in the spaces in which they inhabit. And to its very core, the natural world, like Cheekwood and Chihuly’s art, is for everyone.

After a three-month postponement due to the Covid-19 pandemic, we are delighted to present Chihuly at Cheekwood through January 10. In celebration of the extraordinary exhibition, featuring two new site-specific  works  created  for  Cheekwood’s  landscape,  Cheekwood’s  Curator,  Campbell  Mobley,  had  the  opportunity  to  ask  a  few  questions  and  further  explore  Chihuly’s  processes  and  inspiration  regarding the exhibition, as well as his reflection on the 2010 exhibition.

A Q&A with Dale Chihuly:

Q: What was your process in selecting objects for this show and how did it differ from that in 2010?

A: I approached this show as I typically do, by reacting to the environment. Having presented my work at the estate and gardens in 2010, I was familiar with the footprints, however, new areas have been developed since, and it felt natural to explore them with this new exhibition. Visitors will have a unique experience this year.


Q: What was your inspiration for the two, new, site-specific works in the exhibition – Golden Amber Persian Chandelier in the Loggia and Gilded Yellow and Plum Tower at the Color Garden arches, and how did Cheekwood inform your decisions?

A: I created a similar Persian Chandelier for a project in London a few years ago and thought the scale would work well for the Loggia. Taking the room into consideration, I played with color, ultimately selecting complementary amber hues. The long vista leading to the arches called for a large-scale installation and a bold color palette. I designed the Tower in tones of rich purples and yellows and believe the result will be striking.


PR-Approved-Dale-Profile-Image-1

Q: The 2010 exhibition was so beautiful, attracting many first-time visitors that have turned into lifelong members. How does Cheekwood’s landscape so uniquely highlight your work and what inspired you to accept a second show, 10 years later?

A: The footprint of Cheekwood’s garden is large, yet it retains several intimate spaces. I love its rolling hills and spatial variety, as it allows me to create distinct experiences within one vision. Returning in 2020 allows me to explore new ideas and to bring new work to art and garden enthusiasts.


Q: How do the works in this show enlighten the work you are currently doing with the Chihuly Merletto series? What brought on the evolution?

A: One of the key drivers to my artmaking practice is a need to challenge myself and my team. There is a particular energy and satisfaction that comes out of pushing the glass medium through scale or utilizing techniques that I have never explored. With merletto, I noticed a similarity between the patterns of the ancient technique and early pencil drawings that I created with a bundle of pencils held in my hand. This similarity inspired me to take on a new challenge, and to explore the merletto technique in a new way…in my way.


Q: As you know, the Ann & Monroe Carell Jr. Family Sculpture Trail has recently undergone a major renovation, providing both a paved path and lighting, allowing us to feature your artwork on The Carell Trail, which wasn’t possible in 2010. What went into the decision to show Red Reeds and Float Boat in this location?

A: As with every new project or site, I aim to create and place work that will change one’s experience in the environment. It was the same process for the trail; I wanted installations that people would react to as they move along its path.


Q: This will be the first time I will see one of your neon artworks in person, and I’m thrilled and know our visitors will be as well. Would you discuss the transition in using light as a medium and if, and how, artists like Dan Flavin have inspired those choices?

A: I started exploring neon for art installations in the late ‘60s and continued my experiments with the medium into the early ‘70s. I have always been fascinated by the transmission of light through translucent material and when you introduce color, it is very powerful. Neon is light itself, it communicates color brilliantly, and it couldn’t exist without glass.


Be sure to visit Chihuly at Cheekwood during daytime hours on Tuesday – Sunday or experience the exhibition from a different perspective after dark during Chihuly Nights, running select Tuesday – Sunday evenings. For tickets and more information about Chihuly at Cheekwood, visit https://cheekwood.site/calendar/chihuly-at-cheekwood/.

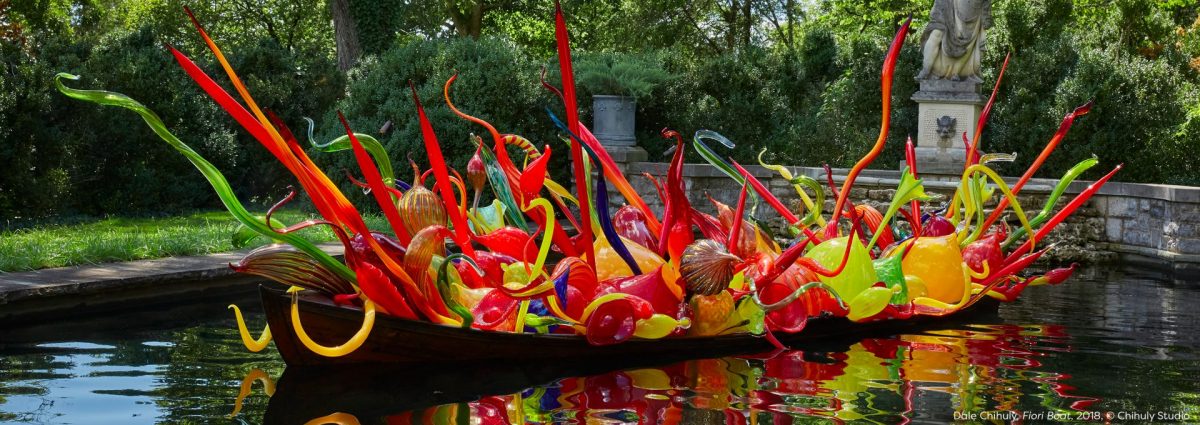
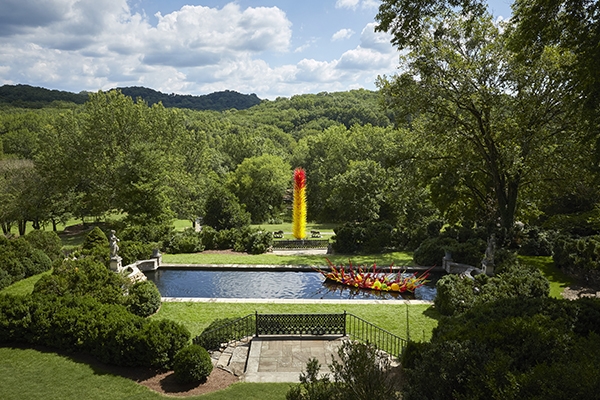
Dale Chihuly, Fiori Boat, 2018, and Scarlet and Yellow Icicle Tower, 2013 © Chihuly Studio

test

Tots! Activity: Fall Leaf Luminary

Tots! Activity: Fall Leaf Luminary

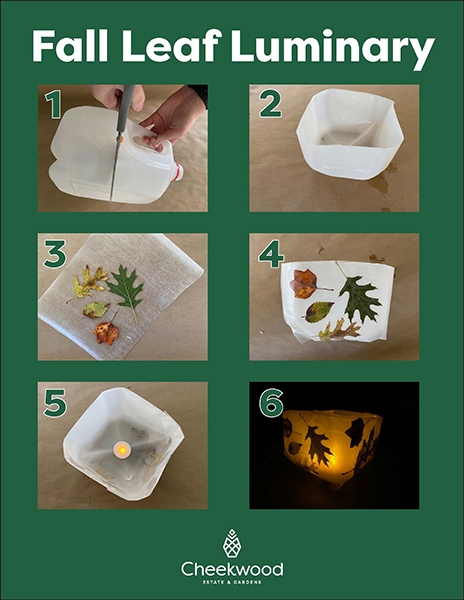
As Cheekwood’s Tots program is temporarily suspended, we are sharing today’s activity for parents and tots to activate at home. Use our files to create your own fall leaf luminary, then share your work with us by tagging @cheekwood on Instagram and using #cheekwoodtots!

Here’s what you’ll need:

• Clear plastic milk jug cut in half

• Clear contact paper

• Fallen leaves of various shapes and colors collected on a walk

• Scissors

• Battery tea light


Directions:

1. Cut the top off of the clear jug.

2. Go outside and collect different leaves. See how many different shapes and colors you can find!

3. Using the clear contact paper, stick leaves onto the jug, making sure to completely cover the leaves.

4. Arrange as many of your leaves onto the jug as you would like.

5. Place the tea light in the jug to complete your luminary.


Try pairing the activity with one of these books:

Kate, Who Tamed The Wind by Liz Garton Scanlon and Lee White

Leaf Man by Lois Ehlert

The Little Yellow Leaf by Carin Berger


Ask your explorer: 

• Describe some of the trees that we saw on our walk while collecting leaves. Can you name the parts of a tree? Leaves, branches, trunk, roots.

• How are the leaves you collected the same/different?

• Pick a leaf and describe it. How does it look, feel, and smell?

Fall-Leaf-Luminary

An Additional Project: Leaf Rubbings

Here’s what you’ll need:

• Leaves left over from luminary project

• Drawing paper

• Crayons with wrappers removed

Directions:

1. Place a leaf under a piece of white drawing paper, vein side up.

2. Using a crayon, gently rub it on the paper over the leaf until you see it appear.

3. Repeat until your paper is filled with colorful leaf prints.

4. Ask your explorer what caused the lines to appear on the rubbing? (veins)

test

Tots! Activity: Yayoi Kusama Pumpkins

Tots! Activity: Yayoi Kusama Pumpkins

About the artist and their work:

Yayoi Kusama is a Japanese artist who lives and works in Tokyo, Japan. Like many artists, she finds ways to express herself through her art. Dots are almost always in her artwork because she feels like she is a small dot among all the other dots of people, stars, and planets.


Here’s what you’ll need:

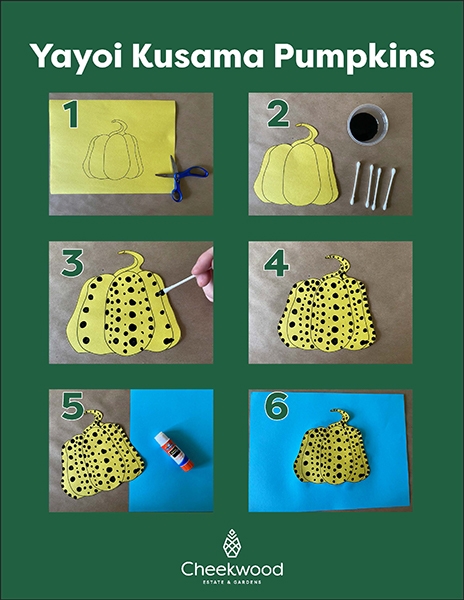
• Pumpkin template *See template below

• Colored construction paper

• Scissors

• Glue

• Black paint

• Q-tips or other round items

Pumpkin Template  


Directions:

1. Print out the pumpkin template onto a colored piece of construction paper.

2. Cut out the pumpkin leaving the black outline on the pumpkin.

3. Cover your pumpkin in polka dots by dipping your q-tip or any other round item into black paint and stamping it.

4. Once your pumpkin is dry, glue it down to an additional pie.


Try pairing the activity with one of these books:

From Here to Infinity by Sarah Suzuki

Yayoi Kusama Covered Everything in Dots and Wasn’t Sorry by Fausto Gilberti


Ask your artist: 

• Kusama made sculptures of pumpkins and then covers them in dots. How did you make your pumpkin?

• Why do you think Kusama likes dots so much? What would you cover in dots?

• Do you ever make art to help express how you’re feeling? What kind?

Yayoi-Kusama-Pumpkins
test

Tots! Activity: The Great Wave

Tots! Activity: The Great Wave

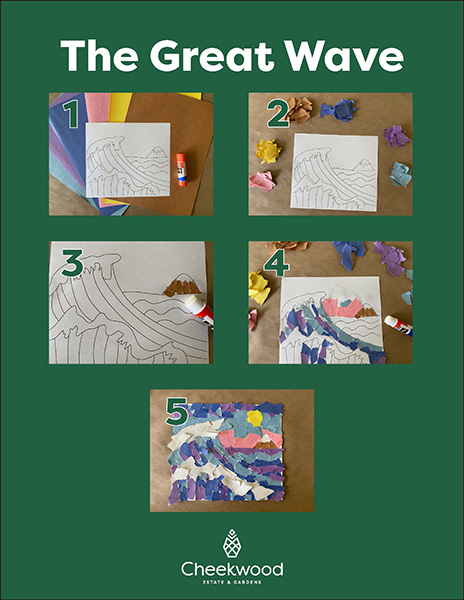
About the artist and their work:Katsushika Hokusai is a Japanese artist. His works were in the Ukiyo-e style of painting and woodblock printing. One of his most famous woodblock print pieces is called The Great Wave off Kanagawa, or just The Great Wave. The Great Wave is from a larger series called Thirty-Six Views of Mount Fuji. At just over 12,300 feet, Mt. Fuji is the highest mountain in Japan.


Here’s what you’ll need:• The Great Wave template
*See template below

• Cardstock or other thick paper

• Glue

• Construction paper in a variety of colors

• Optional: Scissors


Wave Template  


Directions:1. Print off the template on cardstock paper.

2. Rip up or cut the various colored construction paper into small pieces.

3. Glue down your pieces of construction paper on your template to fill in the design.


Try pairing the activity with one of these books:
The Great Wave by Veronique Massenot

Wave by Suzy Lee


Ask your artist: • Hokusai made his wave by carving into wood to make a big stamp. How did you make your wave?

• If you were going to make a lot of pictures of one thing, what would you choose? Why?

• If Mt. Fuji is the highest mountain in Japan, why do you think it appears so small in the artwork?


Alternative art project:Print the wave template onto painting paper. Trace the template with black crayon or black oil pastel. Paint over it with watercolor. How does the watercolor paint interact with the crayon or oil pastel?

The-Great-Wave
test

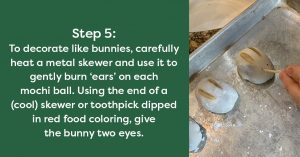
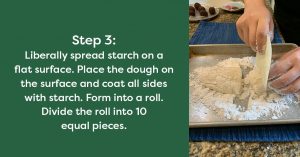
Make Your Own Bunny Mochi

Make Your Own Bunny Mochi

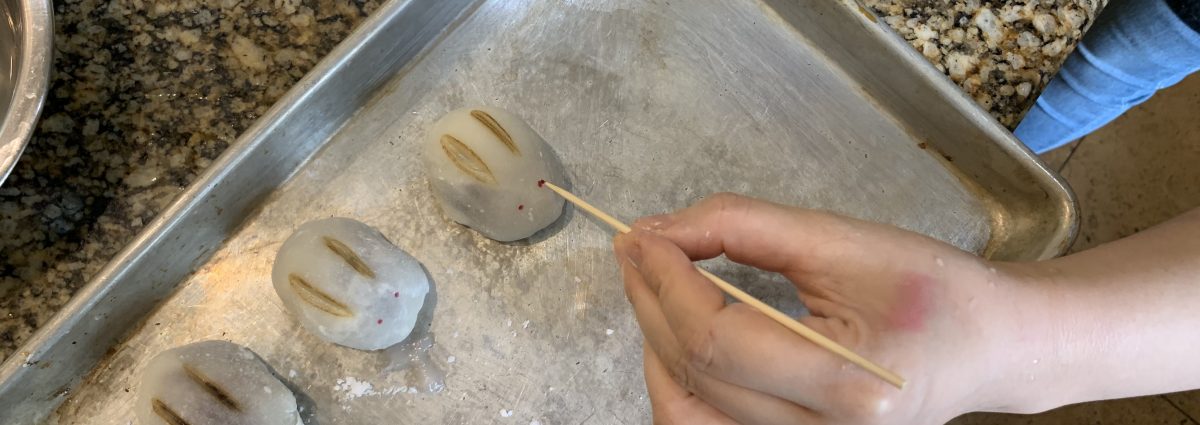
At a traditional Japanese Otsukimi (Moon Viewing) festival you’ll often see wooden platforms stacked high with round dumplings of mochi, called tsukimi dango. These treats are meant to evoke the sight of a full moon, and are often filled with red bean paste or other sweets, like chocolate. You will also see many depictions of rabbits – in Japan, rabbits are strongly associated with the moon. It’s said that you can see the silhouette of a rabbit pounding mochi in the traditional fashion in the shadows of the full moon. 

Ms. Sumiko Wada, Official Chef at Consul General Kayoko Fukushima’s residence, has combined these two ideas to create cute rabbit-shaped mochi. All of the ingredients should be available at local Asian markets (such as Sonobana market in Nashville). We’ve included photos of the ingredients to help you find them.

We hope you will make some bunny mochi yourself and enjoy the sights and tastes of a traditional tsukimi festival!

Ingredients

• 1 15 oz can sweetened red bean paste (Ogura an)

• Red food coloring

• 100g or ½ cup + 1 ½ Tbs refined rice flour (or Japanese sweet rice flour) (Shiratamako)

• 40g or 3 Tbs + ½ tsp sugar

• 140cc or ½ cup + 1 ½ Tbs water

• Cornstarch or potato starch

Find the instructions below to make your own rabbit-shaped mochi!

Enjoy your homemade Bunny Mochi while taking part in our other Otsukimi festivities! 

test

Celebrate Otsukimi with Origami

Simple Rabbit

Did you know Otsukimi was based on a folklore about a rabbit on the moon? It has been said that when The Old Man of the Moon asked three animal friends for food, the rabbit showed the most generosity and kindness. Learn how to fold your own rabbit below!

Here’s what you’ll need:

  • • Square 6×6” paper
  • • Marker or crayon

Directions:

  • 1. Fold a square piece of paper along the diagonal. Open back to a square.
  • 2. Fold the top corner to the diagonal crease you made in step one.
  • 3. Fold down from the diagonal crease.
  • 4. Turn the paper over and position it like an inverted triangle.
  • 5. From the midpoint, fold each side of the triangle, making a square.
  • 6. Lift the corner flaps on the bottom of the square and fold to make ears.
  • 7. Make a small fold inward on each of the cheeks.
  • 8. Lift the bottom corner up toward the top of the head and fold.
  • 9. Turn the paper over and draw the face and ears.
  • 10. Finished!

Harvest Flower

Otsukimi celebrates Harvest, the time of year that Cheekwood displays beautiful fall flowers. What are your favorite flowers during this season? Learn how to fold a harvest flower below!

Here’s what you’ll need:

  • • Square 6×6” paper
  • • Scissors

Directions:

  • 1. Fold a square piece of paper in half. Position so that the crease is on the bottom.
  • 2. Fold in half to make a crease down the middle. Open back to a rectangle.
  • 3. Fold each bottom corner to the middle. Open back to a rectangle.
  • 4. Open each of the bottom corners and push the corners inside the folds, making an inverted triangle.
  • 5. Fold the corners to the midline, making a diamond.
  • 6. Turn the paper over and do the same to the other side.
  • 7. Using a scissors, cut a half-circle just below the side corners of the diamond. Then, customize your flower by making wavy or zigzag cuts.
  • 8. Fold the bottom corner up halfway to make a stem.
  • 9. Gently open the top of the flower using both hands to push the petals outward.
  • 10. Finished!

Traditional Rabbit

Looking for a challenge? Try this origami traditional rabbit below!

Here’s what you’ll need:

  • • Square 6×6” paper

Directions:

  • 1. Fold a square piece of paper along the diagonal. Position so that the crease is on the top.
  • 2. From the midpoint, fold each side of the triangle, making a square.
  • 3. Fold each side corner up toward the top corner, making a diamond.
  • 4. Take the right flap and open to the right, pressing down to make a slanted triangle. Repeat on the other side.
  • 5. Rotate the paper to the left and fold the top section backward and behind.
  • 6. Take the flap on the bottom right and flip it up and behind. Repeat on the flap on the back.
  • 7. Fold the ears over—don’t worry if they aren’t exactly the same!
  • 8. Holding the ears at the top, push the nose downward and fold.
  • 9. Make the tail by folding two small triangles. Make the nose by folding a small triangle under.
  • 10. Finished!
Privacy Policy Sitemap Web design by Speak
Back to top