Arts or Education Archives - Page 8 of 17 - Cheekwood | Page 8
x icon Close
test

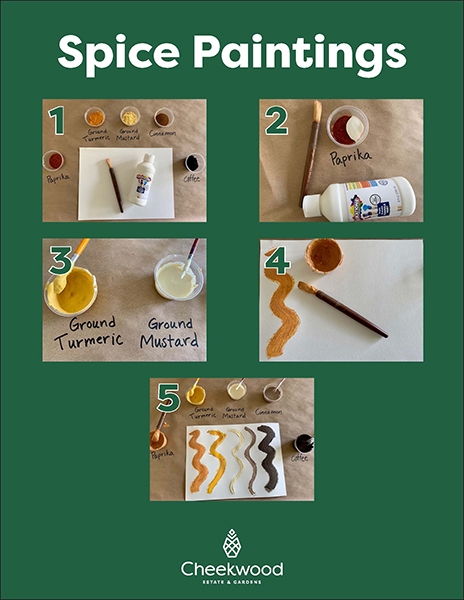
Tots! Activity: Spice Paintings

Tots! Activity: Spice Paintings

As Cheekwood’s Tots program is temporarily suspended, we are sharing today’s activity for parents and tots to activate at home. Use our files to create your own spice painting, then share your work with us by tagging @cheekwood on Instagram and using #cheekwoodtots!

Here’s what you’ll need:• White paint

• Variety of ground spices (turmeric, paprika, cinnamon, ground mustard, coffee, etc.)

• Thick paper

• Small cups to mix paints

• Paint brushes


Directions:1. In several small bowls, mix spices and white paint together. Add more white paint a little at a time until you get your desired consistency. You can always add more spices or paint at any time to adjust.

2. Use the paints you have made to make a painting that smells great!

3. Optional: Brew and steep coffee or black tea to make watercolor paints. Use a tea with hibiscus to get a red color!


Try pairing the activity with one of these books:
Tea Rex by Molly Idle

Something Smells by Blake Liliane Hellman

Big Smelly Bear by Britta Teckentrup


Ask your artist: • How did we create our scented paint?

• Which scent is your favorite?

• What does each scent make you think of when you smell it? (Cinnamon makes me think of apple pie, etc.)

Spice-Paintings
test

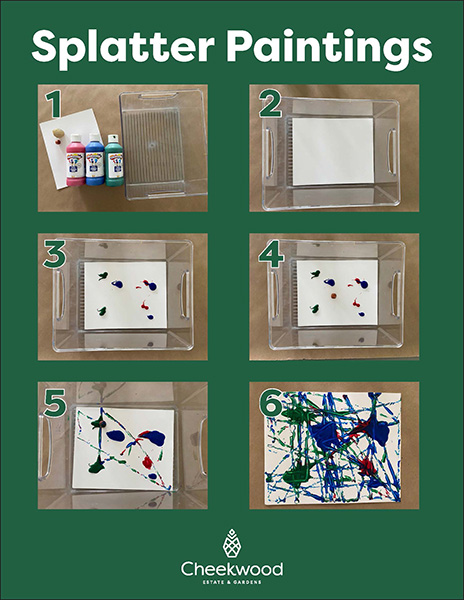
Tots! Activity: Splatter Paintings

Tots! Activity: Splatter Paintings

As Cheekwood’s Tots program is temporarily suspended, we are sharing today’s activity for parents and tots to activate at home. Use our files to create your own splatter painting, then share your work with us by tagging @cheekwood on Instagram and using #cheekwoodtots!

Here’s what you’ll need:• Box or jar

• Paper

• Paint

• Bouncy ball or marble or bell


Directions:1. Cut down a piece of paper to fit in the box. Add little puddles of paint around the paper.

2. Place the ball, marble, bell, or anything that will spread the paint in the box. Try experimenting with different things for different sounds and to see if the splats are different.

3. Shake the box around so that the object rolls through and spreads the paint.


Try pairing the activity with one of these books:
Polar Bear, Polar Bear What Do You Hear? By Bill Martin Jr. and Eric Carle

Mr. Brown Can Moo, Can you? By Dr. Seuss

The Very Quiet Cricket by Eric Carle


Ask your artist: • Did the different objects make different sounds? How did the objects spread the paint differently?

• Was it easy to control where the paint was spread to? Why?

• Did the paints make new colors when they met? What colors did you make?

Splatter-Paintings
test

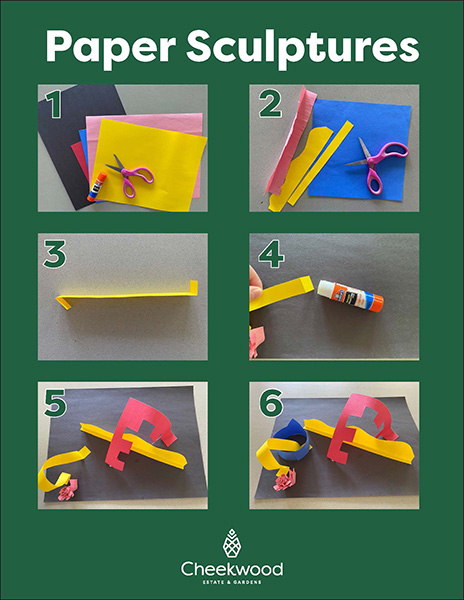
Tots! Activity: Paper Sculptures

Tots! Activity: Paper Sculptures

As Cheekwood’s Tots program is temporarily suspended, we are sharing today’s activity for parents and tots to activate at home. Use our files to create your own paper sculptures, then share your work with us by tagging @cheekwood on Instagram and using #cheekwoodtots!

Here’s what you’ll need:• Colored paper

• Glue

• Scissors

• Cardboard or sturdy paper (for a base)


Directions:1. Cut various shapes and strips out of the colored paper.

2. Fold over ends to have a surface to glue on.

3. Attach paper to base so that it pops up! Not everything has to be attached to the base. It can be glued to or wrapped around other parts.


Try pairing the activity with one of these books:
In Mary’s Garden by Tina and Carson Kugler

A Life Made by Hand by Andrea D’Aquino


Ask your artist: • Tell me about your sculpture. Which side of your sculpture do you like the best?

• If your sculpture was big enough to walk through, where would you put it?

• What is the title for your sculpture?

Paper-Sculptures-1
test

Restore, Renew, Relax with Restorative Yoga

Restore, Renew, Relax with Restorative Yoga

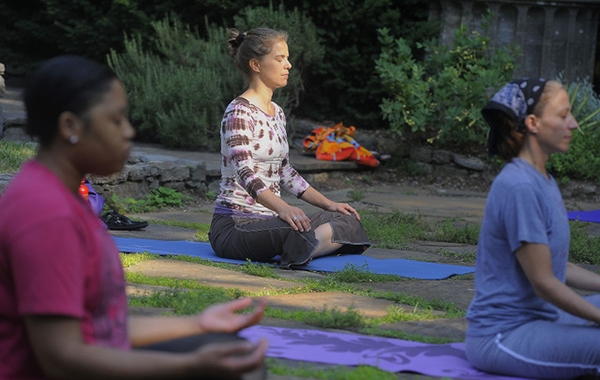
As part of our Cheekwood Harvest Wellness Wednesday series, we will offer a unique yoga experience with TRILUNA Wellness called Restorative Yoga. The class offers a deep, restorative, intensely relaxing and meditative way to reduce stress and increase flexibility. The class is focused on the release of stress and tension we carry in our bodies. Read on to find out what Ashley Brooke James and Elizabeth Moore, the directors of TRILUNA Wellness, have to say about this unique practice.

What is Restorative Yoga?

A restorative yoga class is a deeply relaxing and meditative experience. In a restorative yoga class we will hold poses between 3-5 minutes to encourage the body to go deeper into the pose in an effort to release tension, increase flexibility, and reduce stress.

What are the benefits?

This class is designed to allow our bodies to enter the parasympathetic nervous systems which is known as our “rest and digest” system. When the body is not processing external stressors it conserves energy as it slows the heart rate, increases intestinal movement and drives energy towards digestion. This practice is designed to encourage the body to slow down, conserve energy, and slow production of stress hormones in addition to increasing flexibility slowly over time. It’s perfect for all levels and gentle on joints and ligaments. The poses in this class are held longer, move at an extremely slow pace, and consist mainly of lying down. We like to think of it as an adult nap time.

Is this something I can do myself?

Absolutely! This class is designed with the beginner in mind. It gives us an opportunity to get familiar with our bodies and tune into the areas where we carry tension. Because the class is limited in poses, very comfortable, and mainly consists of lying down it’s easy to execute when in the comfort of our homes.

What inspired you to specialize in restorative yoga?

TRILUNA believes in a beginner’s mindset and what better way to introduce someone to yoga than with a class that offers some of the most comfortable yoga poses. We also noticed that most classes offered in our area are fast paced and largely for intermediate or advanced practitioners. We wanted to create a safe space for beginners and those looking to slow down and relax. We have a real passion for investing in wellness and not just fitness. Learning to slow down, meditate, control the breath, and relax is just as critical to our health as fitness is (in our opinion more so).

What should I wear?

Your pajamas! NO, really. Wear the most comfortable thing you own.

Tell us more about TRILUNA?

TRILUNA is a 100% female-owned company based in Nashville, TN on a mission to make wellness accessible and enjoyable. For everyone. We specialize in getting back to the basics so our classes are designed to cater to all levels of experience and fitness. We believe that an individual is only as well as their community which is why we take a new and unique approach in our wellness programs.

Our featured teacher for the series is Stacey Caron. Stacey is a 200hr certified yoga instructor whose teaching is focused on guiding her students on a journey to uncover the strength, vitality, and perfect balance. She strives to build powerful, yet mindful, flows that facilitate a journey inward. In class, you can expect an intelligent and creative sequence that offers a little bit of sweet surrender.

Yoga

Experience the beauty of our Swan Lawn while joining fellow yogis in this practice. Restorative Yoga classes will be held at Cheekwood each Wednesday morning from September 23 – October 28 at 9:30 AM. To register, please visit our Wellness Wednesday page.

test

Tots! Activity: Pattern Sticks

Tots! Activity: Pattern Sticks

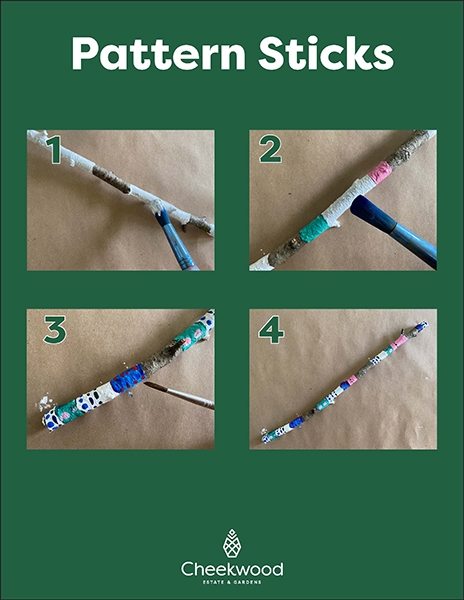
As Cheekwood’s Tots program is temporarily suspended, we are sharing today’s activity for parents and tots to activate at home. Use our files to create your own pattern sticks, then share your work with us by tagging @cheekwood on Instagram and using #cheekwoodtots!

Here’s what you’ll need:• Found sticks

• White paint, various colors of paint

• Paint brushes


Directions:1. Go outside and find a stick that’s about an inch thick.

2. Using white paint, paint stripes on the stick. We did different sizes and left some of the natural stick showing, but you can paint as much or as little as you would like!

3. Let the paint dry.

4. Using bright colors, paint stripes over the white. You can do a pattern of colors or place them randomly. We left some white showing.

5. Let the paint dry.

6. Paint patterns on each block of color.


Try pairing the activity with one of these books:
Pattern Bugs by Trudy Harris and Anne Canevari Green

Elmer by David McKee


Ask your explorer: • How do you make a pattern?

• Can you find patterns in your home and garden?

• What kinds of patterns did you paint?

Pattern-Sticks
test

Tots! Activity: Patterned Crowns

Tots! Activity: Patterned Crowns

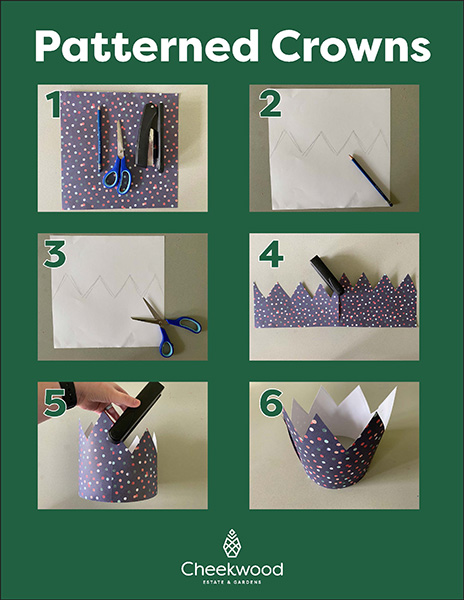
As Cheekwood’s Tots program is temporarily suspended, we are sharing today’s activity for parents and tots to activate at home. Use our files to create your own patterned crown, then share your work with us by tagging @cheekwood on Instagram and using #cheekwoodtots!

Here’s what you’ll need:• Patterned or colored paper

• Markers

• Scissors

• Pencil

• Glue or stapler and staples


Directions:1. If making your own patterned paper, use markers and other drawing supplies to draw your design on a big piece of paper.

2. Take your scrapbook paper or patterned paper and flip it to the back side. Draw a zigzag with your pencil down the middle.

3. Cut along the zigzag line.

4. Attach the ends together.

5. Measure the paper to your tot’s head and attach the open ends so that they fit your tot.


Try pairing the activity with one of these books:
Bees, Snails, and Peacock Tails by Betsy Franco

Pitter Pattern by Joyce Hesselberth


Ask your artist: • A pattern is a repeating design. Can you tell me an example of a pattern?

• Can you describe the pattern on your crown?

• How did you design and make your crown? Why did you choose those colors? Why did you choose that pattern?

Patterned-Crowns
test

Tots! Activity: Recycled Clackers

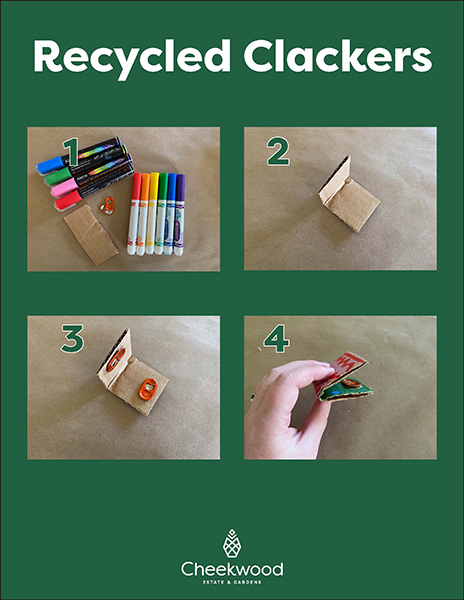
As Cheekwood’s Tots program is temporarily suspended, we are sharing today’s activity for parents and tots to activate at home. Use our files to create your own recycled clackers, then share your work with us by tagging @cheekwood on Instagram and using #cheekwoodtots!

Here’s what you’ll need:• Cardboard

• Bottle caps

• Paint, markers

• Glue


Directions:1. Take a rectangle of cardboard and fold it in half.

2. Glue bottle caps or can tabs to either side so that they touch when the cardboard is folded.

3. Decorate with markers and paint.


Try pairing the activity with one of these books:
Music Class Today by David Weinstone

By the Light of the Moon by Frann Preston-Gannon

Meet the Orchestra by Ann Hayes


Ask your artist: • What did you use to make your instrument? What were these things used for before you used them to make an instrument?

• Can you make a song using what you made?


Make a band:You’ll need your rain stick from Tuesday, an empty tissue box, rubber bands,  glue, and things to decorate.

1. Take your empty tissue box and decorate it.
2. Stretch the rubber bands around the box so that they go over the opening.
3. Secure the rubber bands in place with the glue.
4. Use all the instruments you’ve made to start a band!

Recycled-Clackers
Privacy Policy Sitemap Web design by Speak
Back to top