Arts or Education Archives - Page 6 of 17 - Cheekwood | Page 6
x icon Close
test

Tots! Activity: Woodland Creatures
Tots! Activity: Woodland Creatures

As Cheekwood’s Tots program is temporarily suspended, we are sharing today’s activity for parents and tots to activate at home. Use our files to create your own woodland creatures, then share your work with us by tagging @cheekwood on Instagram and using #cheekwoodtots!

Here’s what you’ll need:• Animal template *See template below
• Brown construction paper

• Felt

• String

• Glue

• Markers or other craft materials


Animal Template


Directions:1. Print the template out. Cut out the pieces and trace them onto felt.

2. Draw the face and details or use other craft materials.

3. Knot the string.

4. Glue the felt pieces together, sandwiching the knotted string between the front and back pieces.


Try pairing the activity with one of these books:
A Walk in the Forest by Maria Dek

Forest Has A Song: Poems by Amy Ludwig VanDerwater

The Busy Tree by Jennifer Ward


Ask your explorer: • What kind of animals live in the woods? Which one is your favorite?

• What shapes did you use to make your animals? What parts did those shapes become?

• How did you make your woodland animals?
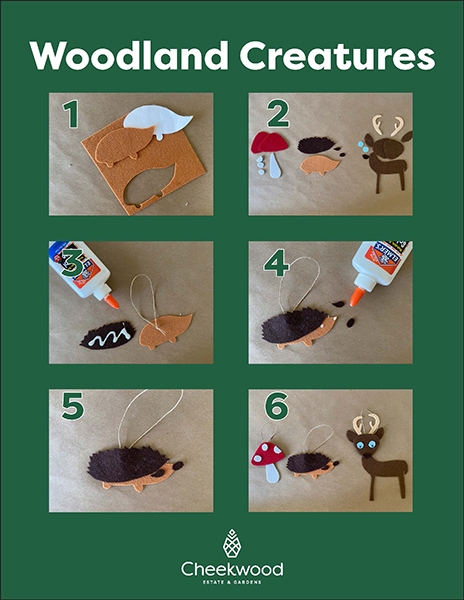
Woodland-Creatures
test

Sugar Skulls

Sugar Skulls and Belmont University

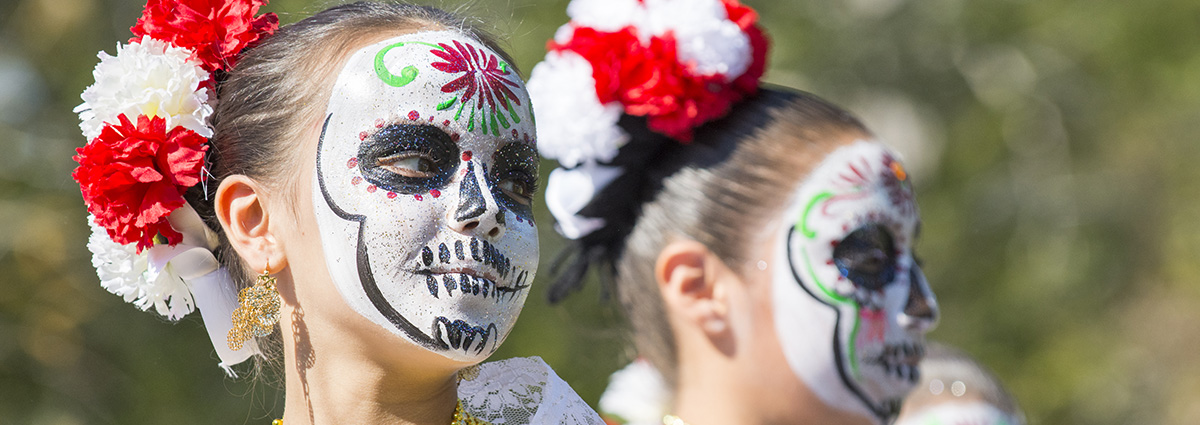
If you’ve visited Cheekwood’s El Día de los Muertos, you’ve undoubtedly seen people carrying around small sugar skulls, and possibly even decorated a few yourself. Sugar skulls, or calaveras de azúcar, are an easily recognizable symbol of the Day of the Dead, and at Cheekwood, there are two stories behind the small items.

The skull has a long tradition in Mesoamerican societies and cultures. While the earliest customs and rituals were lost after the Spanish conquistadors overthrew the Aztec empire in the 1500s, the skull remained central to the celebrations that evolved into the modern Day of the Dead. As an important symbol on any ofrenda, or altar, sugar skulls may have a tiny slip of paper featuring a person’s name on the forehead. It may be the person creating the skull, the one receiving it, or the person being remembered. The skulls are used both as an offering for the departed on an altar and as a sign of affection, with a gentle reminder of mortality, to the living when given as a gift. By sculpting a skull, so closely tied to death, out of sugar, sugar skulls symbolize the bittersweet celebration of remembering those we have lost.

2011-09-16-14.34.00
photo-4

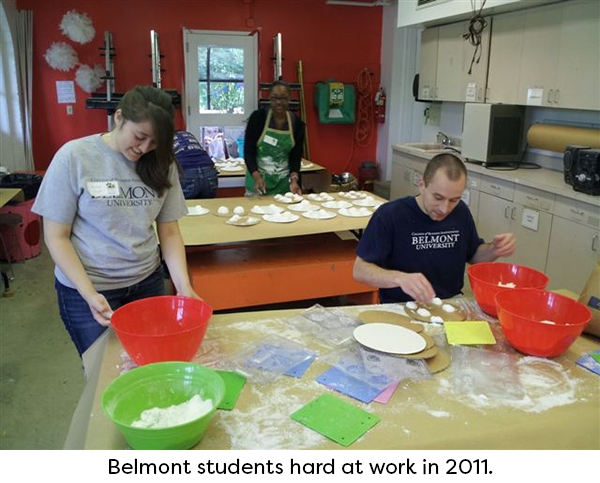
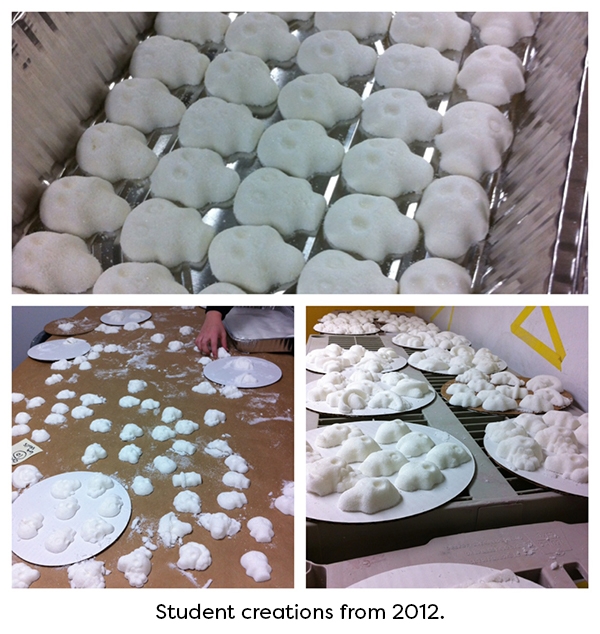
When Cheekwood began celebrating El Día de los Muertos in 2000, a member of the first Advisory Committee was Dr. David Julseth, a Spanish Professor at Belmont University. Professor Julseth, who has always been passionate about involving his students in the Hispanic community through service learning, saw the sugar skulls as a way for students to get hands-on involvement in the growing celebration. Over the years, the tradition has continued and Cheekwood’s El Día de los Muertos wouldn’t be the same without his students. Professor Julseth has his students spend one day, typically the week before the festival, at Cheekwood, where they make hundreds of sugar skulls. Students are given the recipe, the ingredients, the molds, and then they get to work. In 2019, his students made over 1,300 sugar skulls!

Cheekwood is grateful for the support of Professor Julseth, his students, and the rest of the El Dia advisory committee for their hard work in creating such a vibrant celebration each year. Join us online this year and then we hope to welcome everyone back in 2021 with plenty of sugar skulls!

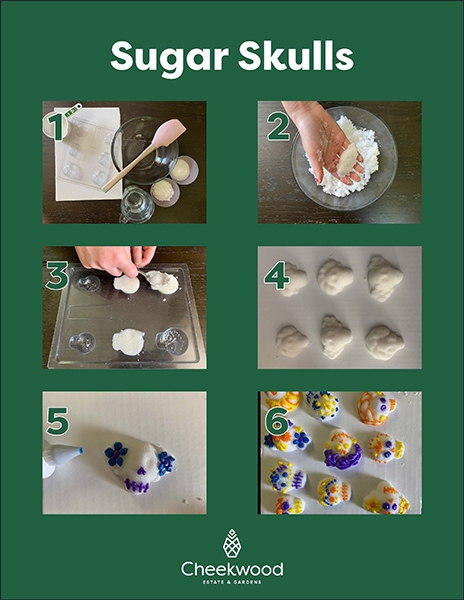
Interested in making your own sugar skulls? Take a look at our step-by-step instructions below!

Make Your Own Sugar Skull

Here’s what you’ll need:

• Sugar

• Meringue powder

• Water

• Mixing bowl

• Mixing spoon

• Measuring utensils

• Sugar Skull molds

• Butter knife

• Cardboard cut to the size of sugar skull mold trays

• Colored icing and tips


Directions:

1. In a mixing bowl, add in your sugar, meringue power and water. For every 1 cup of sugar, add 1 teaspoon of meringue powder and 1 teaspoon of water.

2. Using your hands, combine the ingredients until the mixture holds together when squeezed in your hand. This process will take a few minutes. It should be the consistency of wet sand. If needed you can add a little bit more water, but make sure to mix well and test by squeezing before adding more.

3. Fill up the sugar skull molds by packing the sugar mixture into the individual molds. Use the back of a spoon or your fingertips to pack it tightly. Use a knife to scrape off the excess sugar and then press again with your fingers to smooth the surface.

4. Once all molds are filled, place a piece of cardboard on the back of the sugar skulls. Holding the molds and cardboard together tightly, gently flip it over and place on a table. Lightly tap around the skulls until they release from the mold onto the cardboard. Carefully lift molds away from the sugar skulls.

5. Leave the sugar skulls where they are and set aside to dry for several hours to overnight. They will become solid and easy able to move once dried completely.

6. Once dry, use colorful icing and various icing tips to decorate your sugar skulls. Set aside to dry for a few hours before using as decoration.

Sugar-skulls
test

Monarch Butterflies

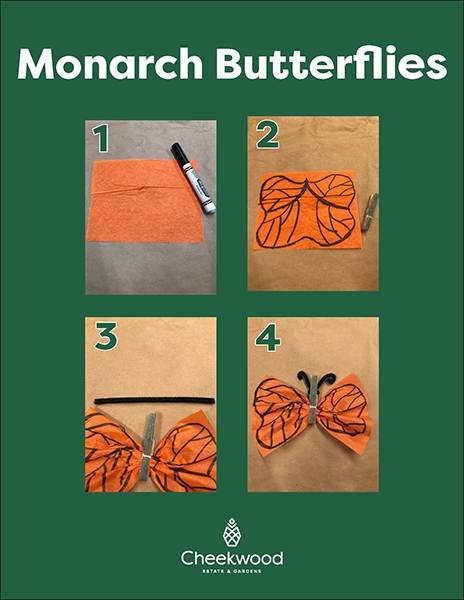
About the tradition: Monarch butterflies are believed to hold the spirits of the departed. Aztec tradition holds that the souls of the departed will return as hummingbirds and butterflies, and the link between myth and the monarchs’ annual return spans centuries. The first monarchs arrive in Mexico for the winter each fall around November 1, coinciding with Día de los Muertos.


Here’s what you’ll need:• Orange tissue paper

• Black markers

• Black paint

• Paint brush

• Black clothes pins

• Black pipe cleaners, cut in half


Directions:1. Paint the clothes pins black and set aside to dry.

2. Cut out a 5” x 5” square from your orange tissue paper.

3. Decorate the orange tissue paper with black marker.

4. Accordion fold your tissue paper.

5. Clip the folded tissue paper in the middle between the clothes pin.

6. Wrap pipe cleaner around the clothes pin and bend them to look like antennae.

Monarch-Butterflies
test

Shoebox Altar

Shoebox Altara

About the tradition: 

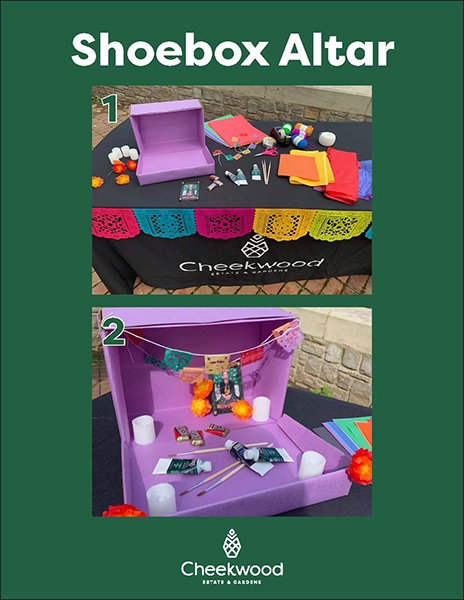
Families gather to build altars honoring their deceased loved ones. They fill them with photos, favorite foods and personal items of their loved ones, making each one unique. Every item placed on the altar has a special significance. Some are meant to entice and guide the spirits home, provide a safe space for them, cleanse them, and be a reminder of the wonderful experiences of life.

Learn more about El Día de los Muertos and altars from Alma Paz-Sanmiguel from Vanderbilt’s Center for Latin American Studies, and local performer Rachel Rodriguez!

Make Your Own!

Here’s what you’ll need:

• Shoebox or other small box

• Clear tape/double sided tape

• Glue

• Scissors

• Pictures of loved ones

• Personal items of loved ones honoring

• Battery operated tea lights

• Real or fake marigolds

• Mini foods

• Wrapping paper/construction paper for covering shoebox

• Tissue paper

• Scissors

• String/yarn

• Sugar skulls


Directions:

1. If your box has flaps, cut the flaps off. They can be used to add levels in your box. You can also leave them to extend your altar.

2. Wrap your box in colorful paper.

3. Add the pictures of who the altar is for inside the box.

4. Decorate by adding in the personal items of the people you are honoring. We used Frida Kahlo in our altar so we are adding in paint brushes and paint as personal items. You can add in favorite foods, clothing, or other items that belonged to or represent the person your altar is for.

5. Finish your altar by adding in additional items such as sugar skulls, tea lights, marigolds, and any other decoration.

Shoebox-Altar
test

La Catrina Puppets

La Catrina Puppets

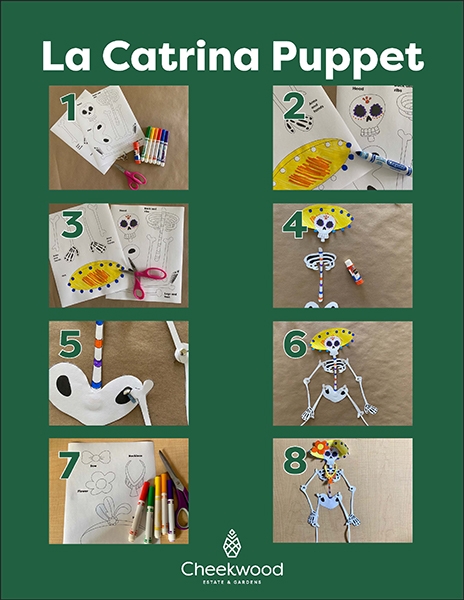
About the tradition: La Catrina first appeared with her fancy hat and clothes as we know her today in the early 1900s because of an artist named José Guadalupe Posada. Today, La Catrina is the most recognizable symbol of El Día de los Muertos.


Here’s what you’ll need:• Catrina template
*See template below

• White cardstock

• Scissors

• Markers, crayons or colored pencils

• Glue or brads


La Catrina Template  


Directions:1. Print the Catrina template on cardstock and cut it out.

2. Arrange the pieces into a skeleton.

3. Attach the pieces together. You can glue the pieces together or use brads at the joints so the arms and legs can move.

4. Decorate your Catrina!

La-Catrina-Puppet-1
test

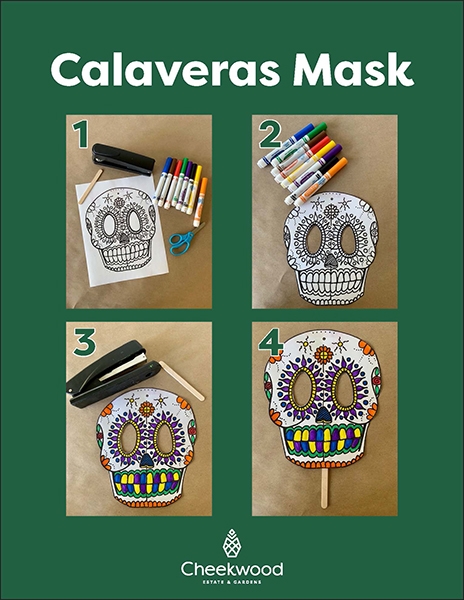
Tots! Activity: Calaveras Masks

Tots! Activity: Calaveras Masks

About the tradition: Calavera, meaning “skull” in Spanish, are typically placed on altars usually in the form of sugar skulls. The calavera has become one of the most recognizable symbols of the Day of the Dead. They are a sign of remembrance.


Here’s what you’ll need:• Mask template
*See template below

• Cardstock

• Markers

• Popsicle sticks

• Staples


Mask Template  


Directions:1. Print the mask template on cardstock cut it out, including the eyes.

2. Color in the mask with marker.

3. Staple your mask to the popsicle stick so you can hold it in front of your face.


Try pairing the activity with one of these books:
The Day of the Dead by Bob Barner

Día de los Muertos by Roseanne Greenfield Thong

Funny Bones: Posada and His Day of the Dead Calaveras by Duncan Tonatiuh

Uncle Monarch and the Day of the Dead by Judy Goldman

Frida Kahlo and Her Animalitos by Monica Brown

Calaveras-Mask
test

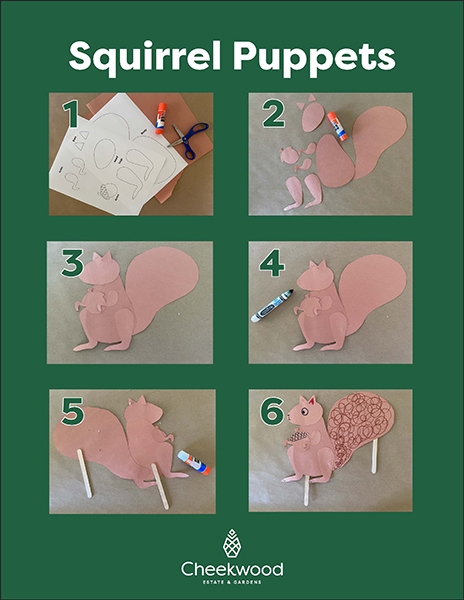
Tots! Activity: Squirrel Puppets

Tots! Activity: Squirrel Puppets

As Cheekwood’s Tots program is temporarily suspended, we are sharing today’s activity for parents and tots to activate at home. Use our files to create your own squirrel puppets, then share your work with us by tagging @cheekwood on Instagram and using #cheekwoodtots!

Here’s what you’ll need:• Squirrel template *See template below
• Brown construction paper

• Scissors

• Glue

• Popsicle stick

• Markers

• Wiggle eyes


Squirrel Template


Directions:1. Print the template onto brown paper.

2. Glue the pieces together to make a squirrel.

3. Add eyes and other finishing touches.

4. Glue squirrel onto the stick to finish your puppet.


Try pairing the activity with one of these books:
Because of an Acorn by Lola M. Schaefer

The Busy Little Squirrel by Nancy Tafuri

Little Acorn by IglooBooks


Ask your explorer: • Why do squirrels hide acorns? Do you think they remember where they are?

• What do acorns turn into?

• Do you see squirrels all the time? What do they do as it gets colder?

Squirrel-Puppets
Privacy Policy Sitemap Web design by Speak
Back to top