Arts or Education Archives - Page 13 of 17 - Cheekwood | Page 13
x icon Close
test

Tots! Activity: Egg Carton Turtles
Tots! Activity: Egg Carton Turtles

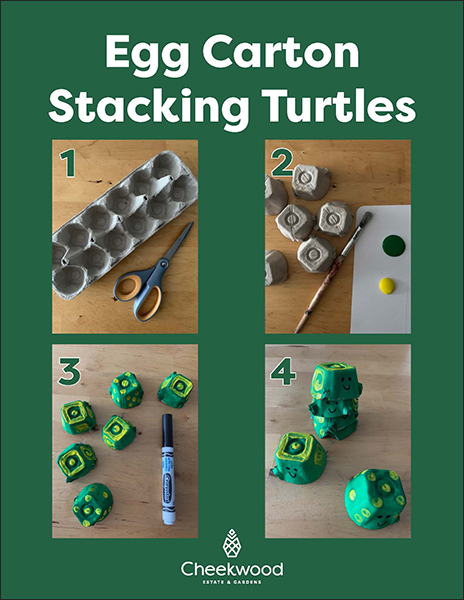
As Cheekwood’s Tots program is temporarily suspended, we are sharing today’s activity for parents and tots to activate at home. Use our files to create your own egg carton turtles, then share your work with us by tagging @cheekwood on Instagram and using #cheekwoodtots!

Here’s what you’ll need:• Egg carton (paper egg carton will work best)

• Scissors

• Green, yellow and brown paint

• Paint brush

• Black marker


Directions:1. Cut paper egg carton into sections so that they look like shells.

2. Paint each section green to look like a turtle and let them dry.

3. Paint on yellow dots and squares for the shell. See how many different turtles you can make.

4. Once completely dry, use a black marker to draw on a face.

5. See how many you can stack without them falling!


Try pairing the activity with one of these books:
Yertle the Turtle by Dr. Seuss

Turtle Splash! Countdown at the Pond by Cathryn Falwell

Mossy by Jan Brett

The Box Turtle by Vanessa Roeder


Ask your explorer: • What did we make our stacking turtles out of?

• What kind of designs did you put on your turtle shells? Why did you pick those designs?

• How many turtles can you stack? Count as you stack them.

• Are there other items at home that we can stack and count? Which items are easier to stack and why?


World Turtle Day is Saturday, May 23! Download our World Turtle Day coloring sheet below:

Turtle Coloring Sheet

Egg-Carton-Turtles
test

Tots! Activity: Turtle Suncatchers

Tots! Activity: Turtle Suncatchers

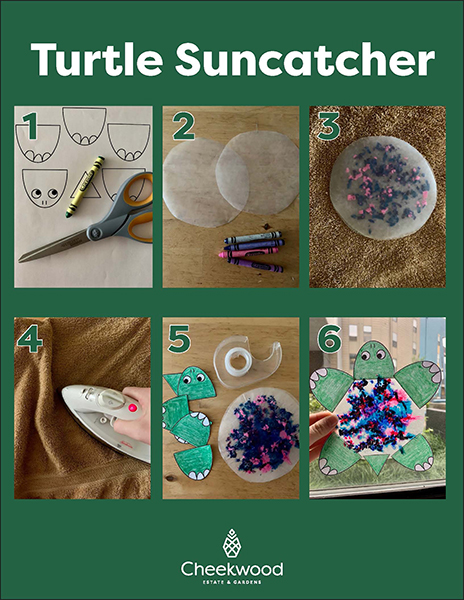
As Cheekwood’s Tots program is temporarily suspended, we are sharing today’s activity for parents and tots to activate at home. Use our files to create your own turtle suncatcher, then share your work with us by tagging @cheekwood on Instagram and using #cheekwoodtots!

Here’s what you’ll need:• Scissors

• Turtle part template
*See template below

• Crayons

• Hand pencil sharpener

• Wax paper

• Glue or tape

• Iron

• Dish towel or rag


Turtle Template  


Directions:1. Print out the turtle template and either color it in or cut it out and trace on colored paper.

2. Cut two same sized circles of wax paper for the shell.

3. Shave old crayons and arrange the shavings in a thin layer onto one piece of the wax paper. Place the other piece of wax paper on top when finished.

4. Iron the wax paper between two old towels until crayon is melted and the wax paper is fused. Check every few seconds to see when crayons melt.

5. Once cooled, attach turtle head, feet, and tail with tape or glue.

6. Punch a hole in your suncatcher and loop string through.

7. Hang your suncatcher in the window!


Try pairing the activity with one of these books:
Turtle and Tortoise Are Not Friends by Mike Reiss

Truman by Jean Reidy and Lucy Ruth Cummins

The Foolish Tortoise by Eric Carle


Ask your explorer: • Where do you think turtles live?

• Are there different kinds of turtles? Do you think their shells look different?

• Do you think a turtle can take its shell off? They cannot! It grows with them.

• How did we make the turtle shell in our craft? How did we get the crayons to melt?


World Turtle Day is Saturday, May 23! Download our World Turtle Day coloring sheet below:

Turtle Coloring Sheet

Turtle-Suncatcher
test

Tots! Activity: Nature Prints

Tots! Activity: Nature Prints

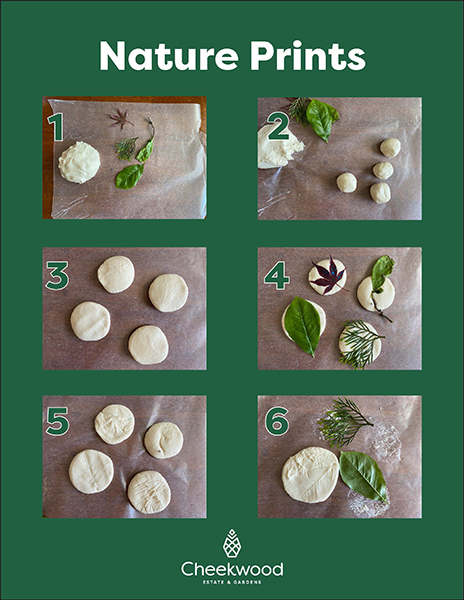
As Cheekwood’s Tots program is temporarily suspended, we are sharing today’s activity for parents and tots to activate at home. Use our files to create your own nature prints, then share your work with us by tagging @cheekwood on Instagram and using #cheekwoodtots!

Here’s what you’ll need:• 2 cups all-purpose flour

• ½ cup salt

• ¾ cup lukewarm water

• Found leaves, twigs, flowers, or any other natural material that has texture


Directions:1. Go on an adventure outside picking up fallen twigs, leaves, and flowers along the way. Look for items with a lot of texture for best results.

2. Make the salt dough by mixing 2 cups flour with ½ a cup of salt in a medium bowl. Slowly knead in ¾ cup of lukewarm water, or until the dough is smooth.

3. Roll dough into small balls, then flatten them slightly with the palm of your hand.

4. Place natural materials on the dough and press down further with the palm of your hand then remove the item. If you want to turn them into a necklace or pendant, poke a hole at least a pinky width away from the edge.

5. Either leave to air dry or bake at 250 for 1.5-2 hours.

6. Once dry, you can paint or color your creations or leave them as is!


Try pairing the activity with one of these books:
The Hike by Alison Farrell

Run Wild by David Covell

Finding Wild by Megan Wagner Lloyd and Abigail Halpin


Ask your explorer: • Can you help me mix this dough? What does the dough feel like?

• How are the natural items we collected similar and different?

• Can you tell me how we made these nature prints?

• Which nature print do you like best? Why?

Nature-Prints
test

Tots! Activity: Nature Brushes

Tots! Activity: Nature Brushes

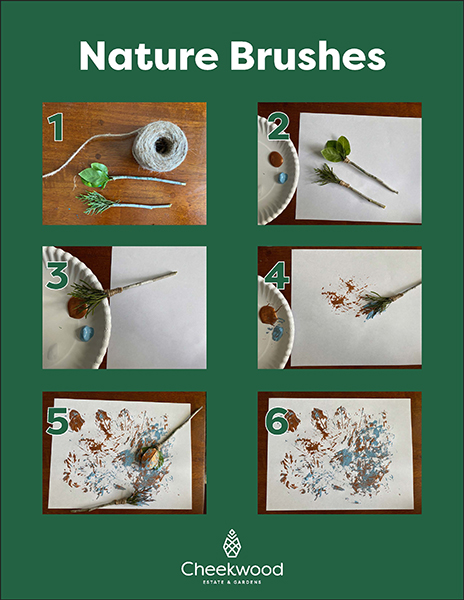
As Cheekwood’s Tots program is temporarily suspended, we are sharing today’s activity for parents and tots to activate at home. Use our files to create your own nature brushes, then share your work with us by tagging @cheekwood on Instagram and using #cheekwoodtots!

Here’s what you’ll need:• Twigs/sticks

• Found leaves, flowers, grass

• String

• Hot glue (optional)

• Paper

• Paint


Directions:1. Go on an adventure outside picking up fallen twigs, leaves and flowers along the way.

2. When ready to paint, use string or hot glue to fasten the natural materials to the twigs to make brushes. If you want to make it easier, you can skip attaching your natural items to the twigs.

3. Use the brushes you’ve made to paint and stamp your own nature paintings!


Try pairing the activity with one of these books:
Grandpa Green by Lane Smith

Florette by Anna Walker

The Balcony by Melissa Castrillion


Ask your explorer: • What did you see on our adventure? What sounds did you hear?

• Compare the natural items you gathered on your walk. How are they similar? How are they different?

• What paintbrush do you like the best? Why?

• What are different ways we can sort the left-over gatherings we didn’t use? Can we sort the natural items by their color, size or type of item?
Nature-Brushes
test

Tots! Activity: TP Roll Fish

Tots! Activity: TP Roll Fish

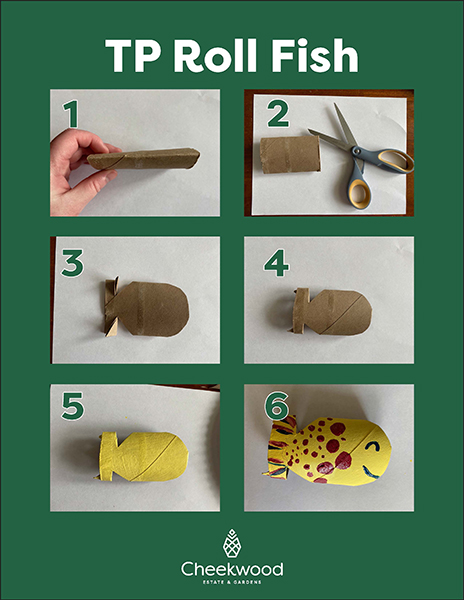
As Cheekwood’s Tots program is temporarily suspended, we are sharing today’s activity for parents and tots to activate at home. Use our files to create your own fish, then share your work with us by tagging @cheekwood on Instagram and using #cheekwoodtots!

Here’s what you’ll need:• Paper towel roll or toilet paper roll

• Paint

• Paint brushes

• Scissors


Directions:1. Flatten cardboard tube.

2. On one open end, cut a semicircle. On the other side, cut two little slits for a tail.

3. Bend those inside the tube to form the tail.

4. Paint your fish!


Try pairing the activity with one of these books:
Swimmy by Leo Lionni

The Pout-Pout Fish by Deborah Diesen

The Rainbowfish by Marcus Pfister


Ask your explorer: • What are some ways animals move? Use the printable cube template below to move like a pond animal.

• Do some animals move in more than one way? For example, on the cube, the duck waddles and flies.

• What is it about an animal that helps them move in a certain way? Is it their fins, wings, legs?


Move like a pond animal: Print out and assemble this cube to move like a pond animal. Cut the image out along the outline. Make sure not to cut between the shapes. Fold the tabs, put glue on the tabs and fold into a cube.


Cube Template

TP-Roll-Fish
test

Tots! Activity: Lily Ponds

Tots! Activity: Lily Ponds

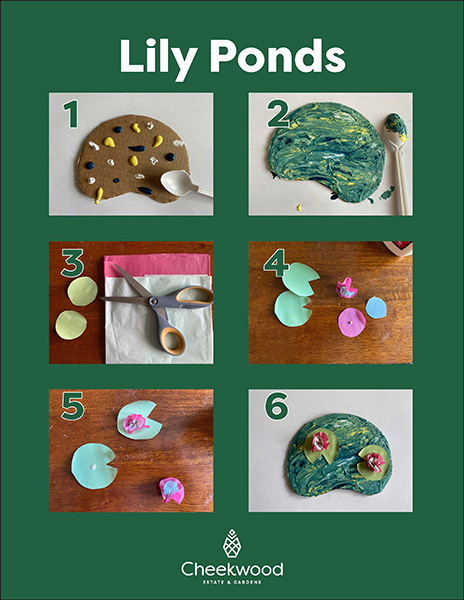
As Cheekwood’s Tots program is temporarily suspended, we are sharing today’s activity for parents and tots to activate at home. Use our files to create your own lily pond, then share your work with us by tagging @cheekwood on Instagram and using #cheekwoodtots!

Here’s what you’ll need:• Cardboard or sturdy paper

• Paint, pastels or crayons in yellow, blue and white

• Paint brush if using paint

• Pink tissue paper (or any color tissue paper)

• Green construction paper

• Glue

• Scissors


Directions:1. Cut out a pond shape from a piece of cardboard or paper if preferred.

2. Scatter dots of white, blue, and yellow paint around the piece of cardboard.

3. Using the back of a spoon or a paintbrush, spread the paint around to cover the pond. Set aside to dry.

4. To make a lily pad, cut out a circle from green construction paper and cut a wedge out of it.

5. To make the flowers, cut out a circle from tissue paper and pinch the middle into a point. Layer more tissue circles for fluffier flowers. Glue onto the lily pads.

6. Once the paint has dried, add your lily pads and flowers.


Try pairing the activity with one of these books:
In the Small, Small Pond by Denise Fleming

Pond Circles by Betsy Franco

Would You Rather Be a Pollywog? (All About Pond Life) by Bonnie Worth


Ask your artist: • What colors did you mix to make green?

• Claude Monet, a famous artist, painted the water lilies in his garden. Can you draw something you see the next time you’re outside?

• Where around your home can you gather inspiration to create art?

• What can you find at a lily pond? Fish, tadpoles, plants, birds?

Liliy-ponds
test

Tots! Activity: Color Wheels

Tots! Activity: Color Wheels

As Cheekwood’s Tots program is temporarily suspended, we are sharing today’s activity for parents and tots to activate at home. Use our files to create your own color wheel, then share your work with us by tagging @cheekwood on Instagram and using #cheekwoodtots!

Here’s what you’ll need:• White paper

• Paper in various colors and old magazines

• Scissors

• Glue


Directions:1. Gather old magazines and paper in a variety of colors.

2. Using the paper you gathered, cut out shapes and objects. You will need a handful of cutouts for each color on the color wheel.

3. Glue your cutouts in a circle on your paper. The colors should form a round rainbow: red, orange, yellow, green, blue, purple, and then back to red.


Try pairing the activity with one of these books:
A Color of His Own by Leo Lionni

Swatch: The Girl Who Loved Color by Julia Denos

Neon Leon by Jane Clarke and Britta Teckentrup


Ask your artist: • Can you name all the colors on your color wheel? What is your favorite color? Why?

• How many different shades of each color are on your color wheel?

• What color would you make if you mixed red and yellow? You would get orange. If you mixed yellow and blue you would make green, blue and red make purple.


Exploring color in and around your home: • Go on a scavenger hunt around your house for objects of various colors and arrange them on the floor to make a large color wheel.

• Take your color wheel outside and use it to identify colors in nature.

• Play a game of I-Spy to help identify colors around the house.

Color-Wheels
Privacy Policy Sitemap Web design by Speak
Back to top