Arts or Education Archives - Page 12 of 17 - Cheekwood | Page 12
x icon Close
test

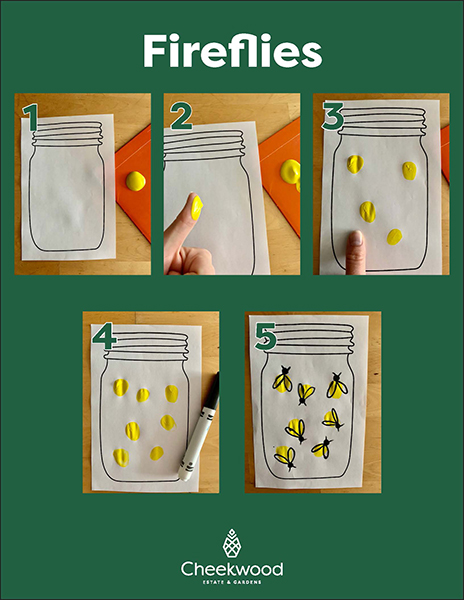
Tots! Activity: Fireflies
Tots! Activity: Fireflies

As Cheekwood’s Tots program is temporarily suspended, we are sharing today’s activity for parents and tots to activate at home. Use our files to create your own fireflies, then share your work with us by tagging @cheekwood on Instagram and using #cheekwoodtots!

Here’s what you’ll need:• Jar template
*See template below

• Yellow paint (glow in the dark if you have it)

• Black pen or marker


Jar Template


Directions:1. Print template and cut it out if desired.

2. Using a round stamp (qtip, cotton ball, fingers, etc.) dot paint inside the jar.

3. Once dry, draw wings and antennae onto the dots to make fireflies.


Try pairing the activity with one of these books:
The Very Lonely Firefly by Eric Carle

Firefly Home by Jane Clarke and Britta Teckentrupp

Lucy’s Light (
Once Upon a Garden) by Jo Rooks


Ask your explorer: • Why do you think fireflies light up?

• Do you think other animals can also do that?

• How is a firefly different from a spider?

• How are fireflies different from other insects?
Fireflies
test

Tots! Activity: Painted Lines

Tots! Activity: Painted Lines

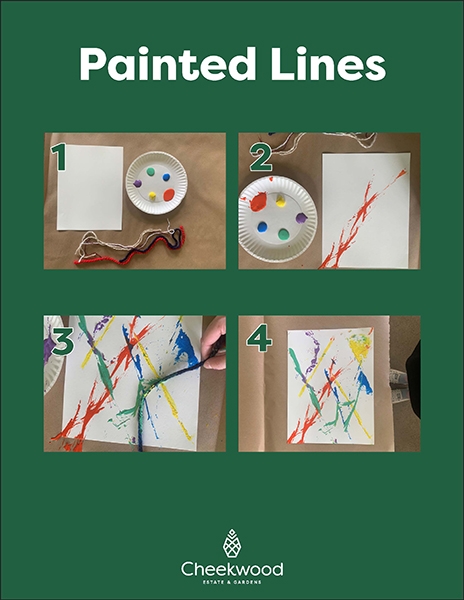
As Cheekwood’s Tots program is temporarily suspended, we are sharing today’s activity for parents and tots to activate at home. Use our files to create your own painted lines, then share your work with us by tagging @cheekwood on Instagram and using #cheekwoodtots!

Here’s what you’ll need:• Yarn, string, twine

• Paint

• Paper


Directions:1. Put paint on a paper plate and cut small pieces of string.

2. Have your Tot dip the string into the paint covering the string or yarn in paint and drag it across a piece of paper to make lines.

3. Encourage them to move the yarn in different ways to make different kinds of lines!


Try pairing the activity with one of these books:
Lines That Wiggle by Candace Whitman and Steve Wilson

Ish by Peter H Reynolds

When a Line Bends… A Shape Begins by Rhonda Gowler Greene and James Kaczman


Ask your artist: • How did you make these lines?

• Why did you choose that color?

• What is your favorite part of your picture? Why?

• Can you describe your lines? Are they wavy, zigzag, curved?

Painted-Lines-1
test

Tots! Activity: Paper Lines Collage

Tots! Activity: Paper Lines Collage

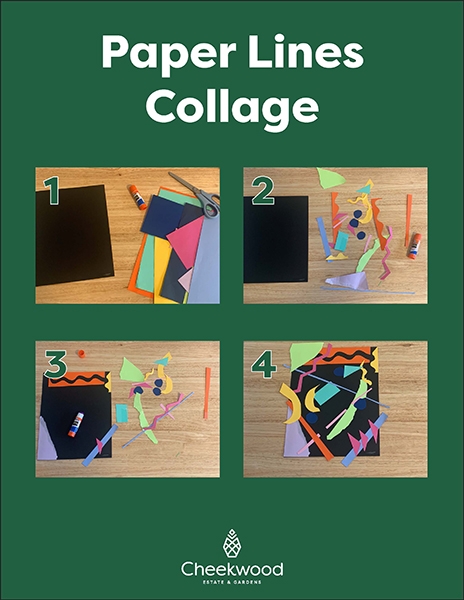
As Cheekwood’s Tots program is temporarily suspended, we are sharing today’s activity for parents and tots to activate at home. Use our files to create your own paper lines collage, then share your work with us by tagging @cheekwood on Instagram and using #cheekwoodtots!

Here’s what you’ll need:• Paper in a variety of colors

• Scissors

• Glue


Directions:1. Cut and rip different kinds of lines to make strips of paper and shapes.

2. Have your Tot arrange their colorful lines onto a separate page and glue them down.

3. Encourage Tots to make several, maybe one is stripes and shapes overlapping while another is using their lines to create a picture.


Try pairing the activity with one of these books:
Swirl by Swirl Spirals in Nature by Joyce Sidman

The Line by Paula Bossio

Harold and the Purple Crayon by Crockett Johnson


Ask your artist: • Where can you find lines around you?

• What can you use lines to make?

• Describe your lines. Are they vertical, horizontal, squiggly, straight?

• Why did you put the lines down like that?

Paper-Lines
test

Tots! Activity: Buzzy Bee

Tots! Activity: Buzzy Bee

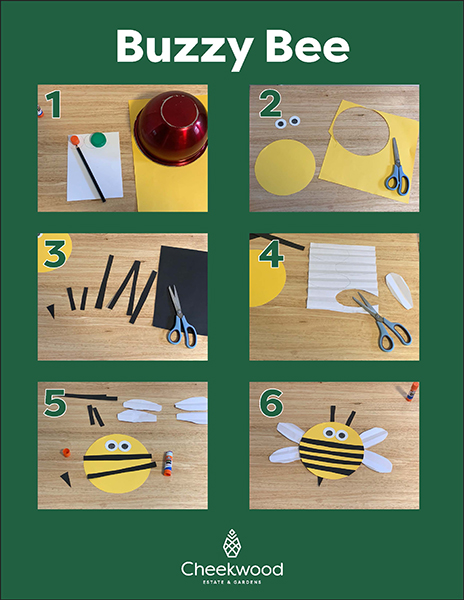
As Cheekwood’s Tots program is temporarily suspended, we are sharing today’s activity for parents and tots to activate at home. Use our files to create your own buzzy bee, then share your work with us by tagging @cheekwood on Instagram and using #cheekwoodtots!

Here’s what you’ll need:• Black, yellow and white paper

• Scissors

• Black marker, crayon or colored pencil

• Bee wing template
*See template below

• Glue stick

• Various sized round items


Bee Template  


Directions:1. Trace two small circles on white paper for eyes. Draw a smaller circle on each for the pupil. For the eyes, we used a milk cap and a glue stick cap for the pupils, but anything round will do! Cut the eyes out and set it aside.

2. Trace one large circle on yellow paper for the bee body. For this, we used a bowl about 8 inches in diameter. Cut it out and set it aside.

3. From black construction paper, cut four long strips, two short ones, and a small triangle. These will be the stripes, antennae, and stinger.

4. Print out the wing template and cut out the wings. Optional: before cutting out the wings, fold the template accordion style.

5. Assemble your bee! You can trim the bee’s stripes if desired.

6. Using a pencil, roll the antennae a little, so it curves outward.


Try pairing the activity with one of these books:
The Honeybee Man by Lela Nargi and Kyrsten Brooker

Bee by Britta Teckentrup

The Very Greedy Bee by Steve Smallman


Ask your explorer: • Why do you think bees are important?

• Why do you think bees like flowers? What is pollen? What is nectar?

• What noise do bees make?

• What do bees make? What do you think they make it for? Honey for food and wax for building their comb.

Buzzy-Bee-1
test

Tots! Activity: Build a Bug

Tots! Activity: Build a Bug

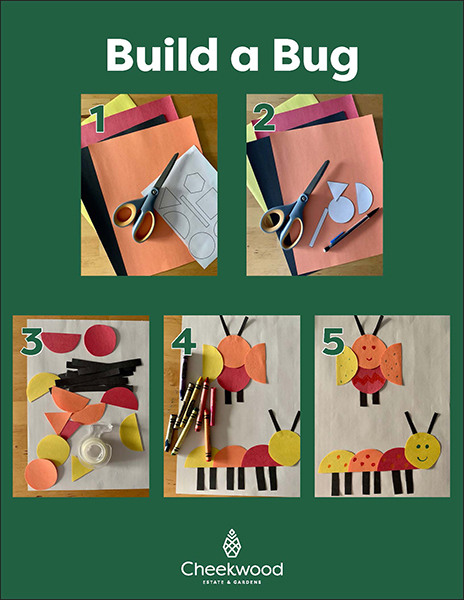
As Cheekwood’s Tots program is temporarily suspended, we are sharing today’s activity for parents and tots to activate at home. Use our files to create your own build a bug, then share your work with us by tagging @cheekwood on Instagram and using #cheekwoodtots!

Here’s what you’ll need:• Construction paper in various colors

• Scissors

• Glue Stick or tape

• Markers or crayons

• Bug parts template
*See template below


Bug Template  


Directions:1. Print out the bug parts template. Color in the parts on the template or trace and cut pieces out of colored paper. Feel free to add as many of your own shapes.

2. Allow your Tot to use the various pieces to create their own bugs.

3. When ready, glue or tape down your bag. Use markers or crayons to decorate your bug!


Try pairing the activity with one of these books:
Some Bugs by Angela DiTerlizzi and Brendan Wenzel

Mrs. Peanuckle’s Bug Alphabet by Mrs. Peanuckle and Jessie Ford

Bugs! Bugs! Bugs! By Bob Barner


Ask your explorer: • What is an insect? What does an insect look like? They have six legs, three body sections, two antennae and a hard covering over its body.

• How are you similar to a bug? You both have heads, legs, eyes, etc.

• Why did you use those pieces to create your bug? How did you put them together?

• What is the name of the bug you made? What noise does it make? What does it do?

Build-a-Bug
test

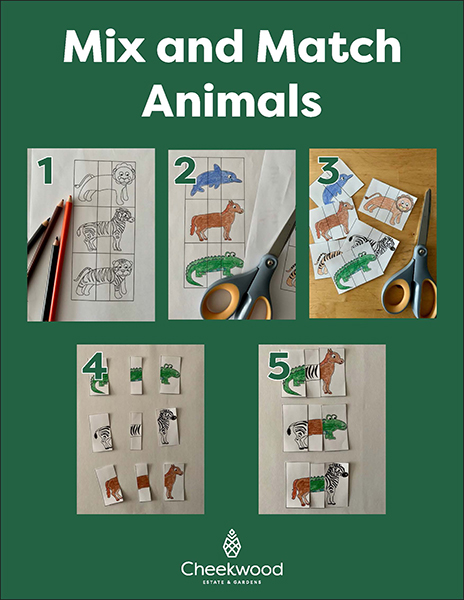
Tots! Activity: Mix and Match Animals

Tots! Activity: Mix and Match Animals

As Cheekwood’s Tots program is temporarily suspended, we are sharing today’s activity for parents and tots to activate at home. Use our files to create your own mix and match animals, then share your work with us by tagging @cheekwood on Instagram and using #cheekwoodtots!

Here’s what you’ll need:• Mix and match animal templates
*See template below

• Crayons, colored pencils or markers

• Scissors

• Glue or tape

• Paper


Animal Template  


Directions:1. Print out the mix and match animal template and color the animals in. Try to make each animal a different color.

2. Cut out the rectangles around the animals, and then the lines to separate the animal parts. You should have three sections per animal.

3. Mix and match pieces to make your own animals!


Try pairing the activity with one of these books:
Lots of Spots by Lois Ehlert

Dr. Seuss’s Book of Animals by Dr. Seuss

Spots, Feathers, and Curly Tails by Nancy Tafuri


Ask your explorer: • What kinds of different coverings do animals have? Fur, feathers, scales, skin.

• Why do you think tigers have fur instead of feathers?

• Why do you think an alligator has skin instead of fur?

• Can you name the new animal you created? Where does it live? What does it like to eat?

Mix-and-Match-Animals
test

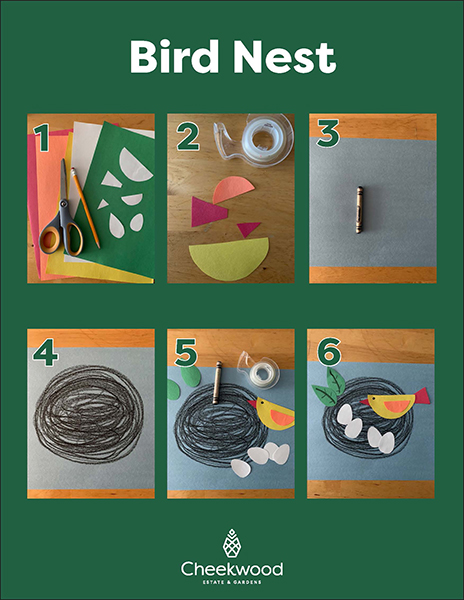
Tots! Activity: Bird Nest

Tots! Activity: Bird Nest

As Cheekwood’s Tots program is temporarily suspended, we are sharing today’s activity for parents and tots to activate at home. Use our files to create your own bird nest, then share your work with us by tagging @cheekwood on Instagram and using #cheekwoodtots!

Here’s what you’ll need:• Bird template
*See template below

• Crayons or markers

• Construction paper in various colors

• Glue or tape

• Scissors


Bird Template  


Directions:1. Print out the bird pieces template. Color the parts in or trace and cut them out of colored paper.

2. On a full piece of paper, draw a big bird nest by drawing ovals over and over or however your Tot decides a twiggy nest is drawn.

3. Assemble your bird by gluing or taping the parts together.

4. Arrange bird, leaves, and eggs in and around the nest and glue or tape all the pieces down.


Try pairing the activity with one of these books:
Birds by Lemniscates

Bird Watch by Christie Matheson

Bird Builds a Nest by Martin Jenkins and Richard Jones


Ask your explorer: • What materials do birds build their nests out of? What would you use to make your nest if you were a bird?

• What do birds use their nests for?

• Have you ever seen a nest in a tree?


Make a bird feeder for your yard: You will need an orange, bird seed, peanut butter, twine, a knife, a small bowl and spoon.

1. Cut your orange in half and scoop out the inside (enjoy as a snack) keeping the peel intact.

2. Poke four equidistant holes into the orange. Run the twine through the holes and tying it at the top so you can hang it up.

3. Fill with a peanut butter and bird seed mixture.

4. Hang it up outside and observe the birds that come to enjoy this treat!

Bird-Nest
Privacy Policy Sitemap Web design by Speak
Back to top