wordpress, Author at Cheekwood - Page 19 of 45 | Page 19
x icon Close
test

Tots! Activity: Rainy Days
Tots! Activity: Rainy Days

As Cheekwood’s Tots program is temporarily suspended, we are sharing today’s activity for parents and tots to activate at home. Use our files to create your own rainy day, then share your work with us by tagging @cheekwood on Instagram and using #cheekwoodtots!

Here’s what you’ll need:• White, yellow, and blue paper

• Cotton balls

• Glue

• Lengths of string


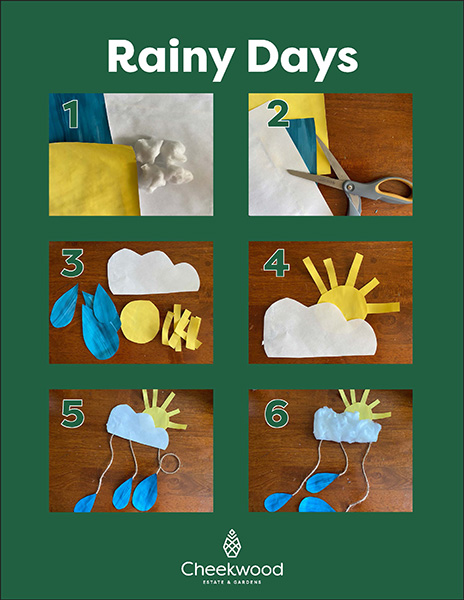
Directions:1. Cut out a cloud from the white paper, a sun from the yellow paper, and raindrops from the blue paper.

2. Glue the sun to the back of the cloud.

3. Glue one end of the string to the back of the cloud. On the other ends add your raindrops.

4. To finish it off, glue your cotton balls onto the cloud to make it nice and fluffy!


Try pairing the activity with one of these books:
Sun! One in a Billion by Stacy McAnulty and Stevie Lewis

Sun by Sam Usher

Watersong by Tim McCanna


Ask your explorer: • What does the rain do for us? What does it do for the plants in the garden?

• What happens to the sun when it rains?

• What do you see in the sky after it rains? What do you think makes rainbows?


For fun when the sun comes out: • Try using a Sun print paper kit and found objects to explore the sun more!

• Make a few shallow cups with aluminum foil and put some broken up old crayons in a variety of colors in the cups. Place the cups in the sun, and wait for them to melt to make your own crayons!
Rainy-Days
test

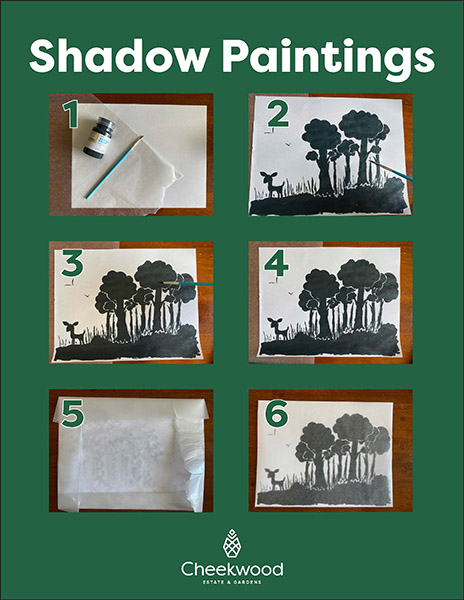
Tots! Activity: Shadow Paintings

Tots! Activity: Shadow Paintings

As Cheekwood’s Tots program is temporarily suspended, we are sharing today’s activity for parents and tots to activate at home. Use our files to create your own shadow painting, then share your work with us by tagging @cheekwood on Instagram and using #cheekwoodtots!

Here’s what you’ll need:• Painting paper

• Paint brush

• Black paint

• Wax paper


Directions:1. Paint a picture of shadows and silhouettes.

2. Take a piece of wax paper big enough to cover your painting and attach it to your paper by folding around the edges and taping it down to hold it in place.

3. Enjoy your shadowy painting!


Try pairing the activity with one of these books:
Nothing Sticks Like a Shadow by Ann Tompert

The Black Rabbit by Philippa Leathers


Ask your artist: • Do you think everything has a shadow?

• How do you make a shadow?

• Can you make a shadow puppet show?

Shadow-Paintings-1
test

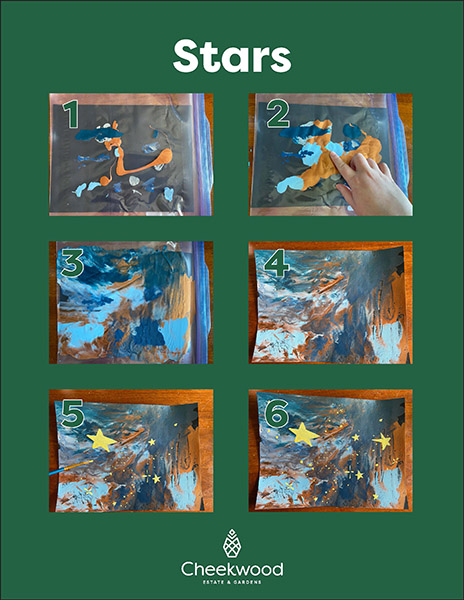
Tots! Activity: Stars

Tots! Activity: Shadow Paintings

As Cheekwood’s Tots program is temporarily suspended, we are sharing today’s activity for parents and tots to activate at home. Use our files to create your stars, then share your work with us by tagging @cheekwood on Instagram and using #cheekwoodtots!

Here’s what you’ll need:• Ziplock bag

• Paper

• Paint

• Star template or star stickers
*See template below


Star Template


Directions:1. Put blobs of different shades of blue paint on a piece of paper. You can also use other colors that remind you of space such as purple, metallic, and glitter.

2. Place paper in a Ziplock bag and seal. Allow tots to play and squish the paint all over the paper.

3. Remove painting from bag and place in a safe place to dry.

4. Add stars to the painting using the star template, paint, and stickers.


Try pairing the activity with one of these books:
How to Catch a Star by Oliver Jeffers

Stars by Mary Lyn Ray

Henry’s Stars by David Elliot


Ask your explorer: • Why do you think we can’t see the stars during the day?

• Star pictures are called constellations, and they usually have stories behind them. Can you connect the stars on your painting to make your own pictures and stories?

• Have you ever gone stargazing? Do you want to go stargazing? Use the telescope you made last week!

• For more information on the stars you might see tonight, head on over to The Adventure Science Center website for the July star chart.

Stars-1
test

Member Monday

Member Monday

On Monday, July 20, we opened for a day of celebration exclusively for our members. Cheekwood members have the benefit of unlimited access to the grounds, free parking, priority access to special event tickets and reciprocal admission to nearly 200 botanical gardens, arboreta and conservatories nationwide, and over 60 museums in the Southeast.

What else is there to love about being a Cheekwood member? We asked a few people what they enjoyed most about their memberships.

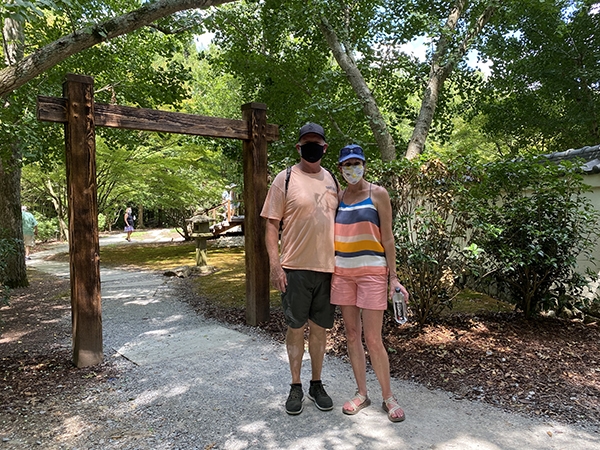
“I have a Family Membership, and I renew each year because I love all the activities I can bring guests to. Christmas is my all time favorite, and I love the songwriter nights. To be able to live in a big city and come out here and walk these gardens at my whim is a gift from God. We love it!”

– Terry McAlister

Terry-McAlister

“We love coming here! It’s great for the little one. He loves looking at the TRAINS! exhibit and being able to run around down there. We love to get our walks in in such a beautiful setting.”

– Maria Mieling

Clay-Susan-Sistrunk

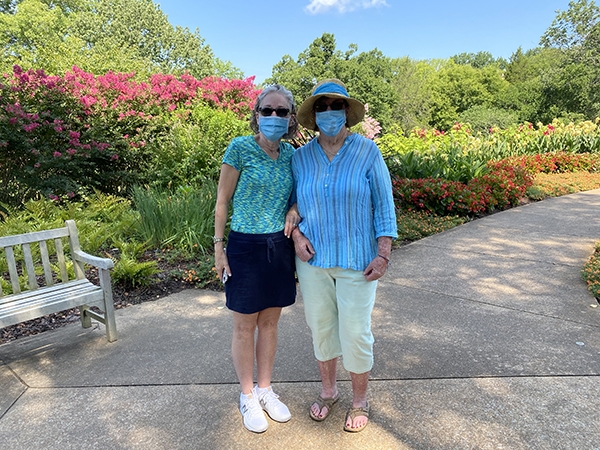
“We love being able to come out and completely relax for an hour or two. It’s such a blessing to have this place. During the pandemic we spend a lot of time gardening, so coming out here and getting ideas has been really fun.”

– Clay & Susan Sistrunk

Clay-Susan-Sistrunk
test

Tots! Activity: The Moon

Tots! Activity: The Moon

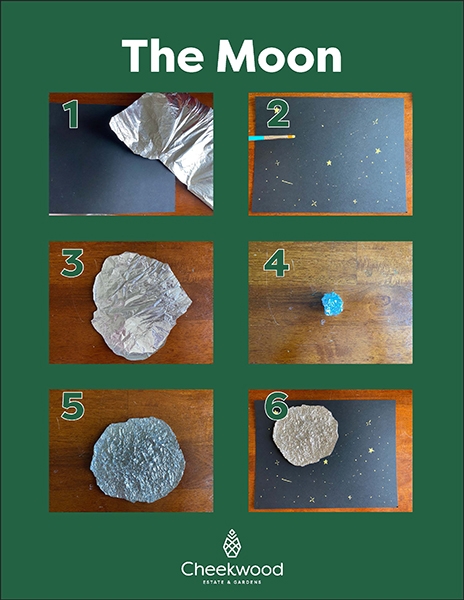
As Cheekwood’s Tots program is temporarily suspended, we are sharing today’s activity for parents and tots to activate at home. Use our files to create your own moon, then share your work with us by tagging @cheekwood on Instagram and using #cheekwoodtots!

Here’s what you’ll need:• Black paper (or black paint)

• Foil

• Glue

• Star stickers (or paint)


Directions:1. On black paper, use star stickers or paint to add stars to make the night sky.

2. Crinkle a circle of aluminum foil and flatten it back out.

3. Choose a spot in your night sky and glue your foil moon down.


Try pairing the activity with one of these books:
Moon by Britta Teckentrup

Moon! Earth’s Best Friend by Stacy McAnulty and Stevie Lewis

I Took the Moon for a Walk by Carolyn Curtis and Alison Jay


Ask your explorer: • Can you explain how you made your picture?

• Is the moon always in the sky? Can you see it during the day?

• What do you think the moon is made of? What do you think it would be like to go there?


For extra fun, make moon sand: 1. Start with 8 cups on flour and one cup of baby oil.

2. Mix ingredients together with a whisk or pastry cutter.

3. Play!

The-Moon
test

Tots! Activity: Telescopes

Tots! Activity: Kites

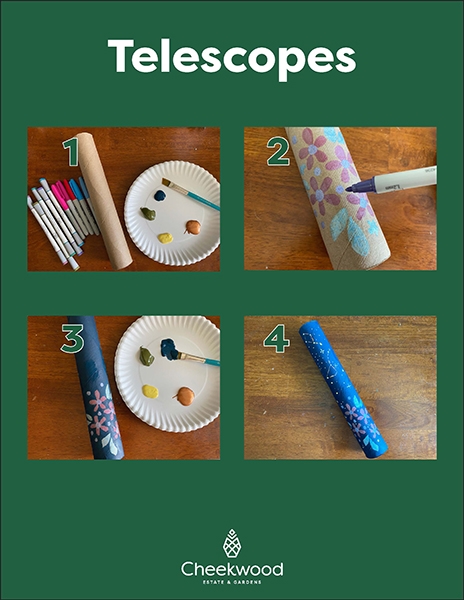
As Cheekwood’s Tots program is temporarily suspended, we are sharing today’s activity for parents and tots to activate at home. Use our files to create your own telescope, then share your work with us by tagging @cheekwood on Instagram and using #cheekwoodtots!

Here’s what you’ll need:• Cardboard tubes

• Paint

• Stickers

• Markers

• Tissue paper

• Toothpick

• Rubber band


Directions:1. Decorate your cardboard tube with paint, stickers, and markers. If you don’t have a longer tube, consider making binoculars with two smaller ones; glue or tape them together.

2. On one end of your telescope, use a rubber band to fix tissue paper or paper to your telescope.

3. Use a toothpick to poke holes in the paper to make constellations.

4. Look at the constellations you made through your telescope or use it to observe and find things!


Try pairing the activity with one of these books:
Good Day, Good Night by Margaret Wise Brown and Loren Long

Day and Night by Teddy Newton


Ask your explorer: • What kind of things do you see through your telescope? Does it help you focus?

• Who do you think would use a telescope?

• Can you use your telescope to find something red? Play a search-and-find game using the telescope.

Telescopes
test

Tots! Activity: Kites

Tots! Activity: Kites

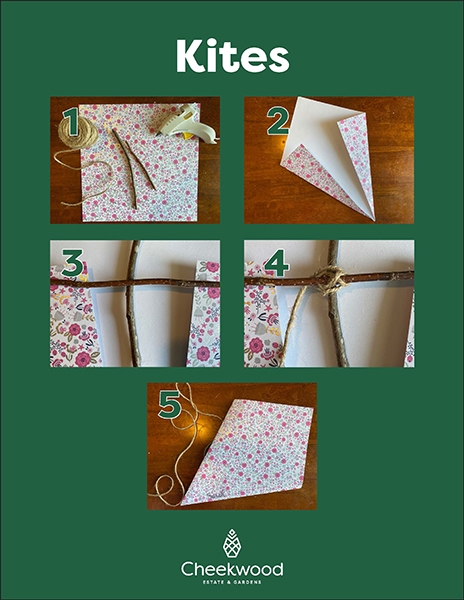
As Cheekwood’s Tots program is temporarily suspended, we are sharing today’s activity for parents and tots to activate at home. Use our files to create your own kite, then share your work with us by tagging @cheekwood on Instagram and using #cheekwoodtots!

Here’s what you’ll need:• Paper

• Paper straws or sticks

• String

• Glue/hot glue/tape

• Scrap string or ribbon (optional bows)

• Markers/crayons/stickers (optional decoration)


Directions:1. Fold or cut chosen paper into a diamond kite shape. Thicker paper tends to hold up better; we used scrapbook paper. Decorate!

2. On the back side of your kite, fix the straws or sticks into a “t” shape using tape or glue.

3. Tie the string where your sticks cross so your kite doesn’t fly away!

4. Add finishing touches like a tail with some bows on it.

5. Fly your kite!


Try pairing the activity with one of these books:
Stuck by Oliver Jeffers

Bear Out There by Jacob Grant


Ask your explorer: • Does your kite fly? If not, what do you think you can do to it to help it fly?

• What keeps your kite in the air?

• Why did you design and decorate your kite this way?

Kites
Privacy Policy Sitemap Web design by Speak
Back to top